...
- Open up Illustrator

- Go to “File”, “New…”. On the new window, name your file. Be sure to set Width: 6 in, Height: 4 in, and Units: Inches. Click “OK”.

- Press CTRL+R to bring up the rulers to double check that the dimensions of the canvas are correct.
- Go to “File”, “Place…”, and select your image. Your photo should appear on the canvas.
- We will be printing two images on a single 4x6 photo sheet, so we need to place another image on the canvas.
- Repeat step 4 by placing the same image again or…
- Select your image, press CTRL+C, and then press CTRL+V to copy and paste your image.
- Space them out, but do not place them close to the edge because the printer will cut off part of the image. See the sample screenshot on the next page.
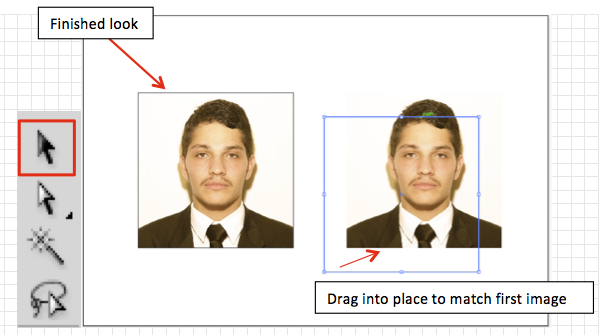
- Select the rectangle tool from the tool palette.

- Drag a square around to create a frame around the photo. Once you drag the square, you need to adjust some parameters at the top. Fill: Clear (Red diagonal through white square) and Stroke: 0.5 pt (selected using the drop down menu)

- Press CTRL+C and then CTRL+V to copy the frame. Select the mouse tool, then drag the new square onto the second image.
And that’s it! You are ready to print now. Go to “File”, “Print…”. Make sure:
a. Printer parameter is set to DMC Photo
b. Size parameter is set to 4 x 6 in
c. Should you need more than 2 passport photos, increase the Copies count before printing. Remember that two usable images will be printed on every photo sheet- Click “Print”, and proceed to the service to desk to pay for your prints and trim the white space around the photos.