...
If you are completing this tutorial from a public computer in Fondren Library and are logged on using the gistrain profile, follow the instructions below:
- On the Desktop, double-click the Computer icon > gisdata (\\fon-gis04) (O:) > Short_Courses > Getting_Started_with_ArcGIS_Series > Introduction_to_GIS.
- To create a personal copy of the tutorial data, drag the IntroTutorialData folder onto the Desktop.
- Close all windows.
OPTION 3: Accessing tutorial data online using a personal computer
If you are completing this tutorial from a personal computer, you will need to download the tutorial data online by following the instructions below:
- Using a web browser, go to the Introduction to GIS short course webpage at: http://library.rice.edu/gis-intro
- At the bottom of the webpage, under the Resources section, click the Introduction to GIS – Tutorial Data link Click Intro.zip to download the tutorial data.
- Unzip the IntroTutorialData Intro folder.
- Copy the unzipped IntroTutorialData Intro folder to your Desktop or another location of your choice. Ensure that you note the file path of the location you have selected.
Any time throughout the tutorial that you see reference to the file path C:\Users\gistrain\Desktop\IntroTutorialData, you will need to substitute it with the file path you have just selected.
The following step-by-step instructions and screenshots are based on the Windows 7 operating system with the Windows Classic desktop theme and ArcGIS for Desktop 10.1 SP1 software with an Advanced license. If your personal system configuration varies, you may experience minor differences from the instructions and screenshots.
...
Getting Started with ArcGIS Pro
Managing Projects
Opening an Existing Project
- Using Windows Explorer, locate and open your Intro folder.
- Double-click on the the Intro.aprx file to open the existing project in ArcGIS Pro.
Creating a New Map
A map is a project item used to display and work with geographic data in two dimensions. The first step to visualizing any data is creating a new map.
- On the ribbon, click the Insert tab.
- In the Project group, click the New Map button.
- In the Contents pane, click Map to select it.
- Click directly on the word "Map" a second time to rename it and type, "Super Neighborhoods". (If you end up double-clicking Map and open Map Properties, then rename under the General tab, the Name box.
Saving a Project
Any time you create a new project item, such as a map or a layout, or any time you spend time changing symbology to your liking, it is a good idea to save your project.
- Above the ribbon, on the Quick Access toolbar, click the Save button.
Managing Maps
Browsing Existing Data
As a reminder, in the Intro to GIS Data Management tutorial, we imported the feature classes of interest into our project geodatabase.
- In the Catalog
Adding Data to a Map
In the Catalog Pane, double-click Databases > Intro.gdb to expand the contents.
Right-click the Census_2010_By_SuperNeighborhood feature class and select Add To Current Map.
Alternatively, click and hold the Major_Roads feature class and drag and drop it into the map view.
Symbolizing Layers with a Single Symbol
Change color of neighborhoods to light orange and border to medium gray.
...
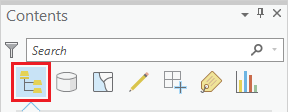
Navigating the Contents Pane
The panel on the left side of ArcGIS Pro is called the Contents pane. At the top of the Contents pane, there is a series of seven buttons. By default, the leftmost button is selected, List by Drawing Order.
When this button is selected, the order in which the layers are listed corresponds to the order in which the layers are visually stacked in the Map view. To test how the drawing order works, let's reorder the layers.
...