...
- At the top of the Geoprocessing pane, click the Back arrow button.
- At the top of the Geoprocessing pane, click the Toolboxes tab.
- Click the Spatial Analyst Tools toolbox > Interpolation toolset > IDW (Inverse Distance Weighted) tool.
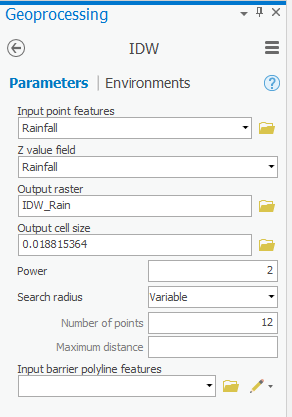
- For ‘Input point features’, use the drop-down menu to select the Rainfall layer, which contains your rain gauge point locations.
- For ‘Z value field’, use the drop-down menu to select the Rainfall field that contains the rainfall measurements you wish to interpolate.
- For ‘Output raster’, rename the exported raster from “Idw_Rainfall1” to “IDW_Rain”.
- Ensure that your 'IDW' tool Parameters tab appears as shown below and click Run.
...
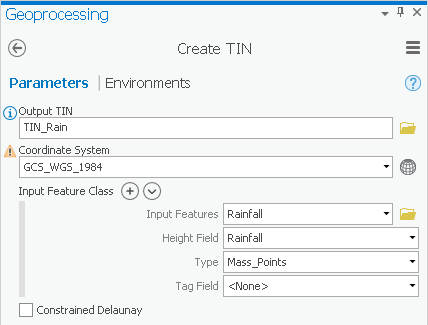
- For ‘Input Features’, use the drop-down menu to select the Rainfall layer.
- For ‘Height Field’, use the drop-down menu to select the Rainfall field.
- Ensure your ‘Create TIN’ window Ensure that your 'Create TIN' tool Parameters tab appears as shown below and and click Run.
This method interpolates the rainfall data points by defining the vertices of each triangle in the TIN and interpolating across each triangle. From here, it is very simple to convert the TIN to a raster, so that it is in the same format as your other interpolation layers.
- In At the top of the Geoprocessing pane, click the Back arrow button.
- Within the 3D Analyst Tools toolbox, collapse the Data Management toolset.
- In Within the 3D Analyst Tools toolbox, double-click the Conversion toolset > From TIN toolset .Click the TIN to > TIN To Raster tool.
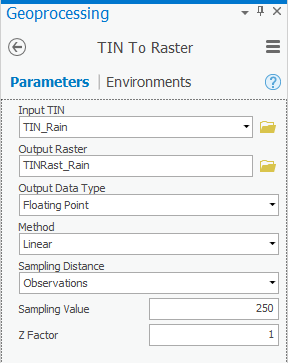
- Use the For ‘Input TIN’, use the drop-down box to select the TIN_Rain TIN.
- For ‘Output raster’, rename the exported raster from “TIN“tin_Rainrain_Tin” tin” to “TINRast_Rain”.
- Ensure your ‘TIN to Raster’ window Ensure that your 'TIN To Raster' tool Parameters tab appears as shown below and and click Run.
- In the Contents pane, uncheck the TIN_Rain layer to view the new raster layer created from the TIN.
- Repeat steps 11-16 above in the Inverse Distance Weighted Interpolation Method section on page 12 to symbolize the TINRast_Rain layer as you did the other raster layers.
...
- In the Contents pane, check the Hurricane layer to make it visible.
- At the top of the Geoprocessing pane, click the Back arrow button.
- In ArcToolbox navigate to 3D Analyst Tools > Data Management > TIN > Create TIN.
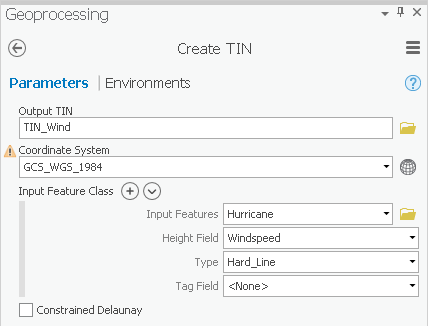
- For ‘Output TIN’, type “TIN_Wind” and click elsewhere to update the text field.
- Use the ‘Input Feature’ drop-down box to select the Hurricane feature class.
- Use the ‘Height Field’ drop-down box to select the Windspeed field as shown below.
- Use the ‘Coordinate System’ drop-down box to select the Houses layer.
- Ensure your ‘Create TIN’ window Ensure that your 'Create TIN' tool Parameters tab appears as shown below and and click Run.
Again, you need to convert the TIN to a raster, so that it is comparable to the other interpolation layers.
...