...
- In the Catalog pane, right-click Folders and select Add Folder Connection.
- In the left column click This PC. In the right column, click Downloads and click OK.
- In the Catalog pane, expand Downloads.
- Fully expand all folders and geodatabases in the Downloads folder.
- We will repeat the above process to connect to a folder containing a sample of NHGIS data. In the Catalog pane, right-click Folders and select Add Folder Connection.
- In the left column click This PC. In the right column, click gisdata (\\file-rnas.rice.edu)(R) > Short_Courses_HIST207 > HIST207_GDC2 > NHGIS_Data and click OK.
- In the Catalog pane, expand NHGIS_Data.
- Your 'Folders' directory should look like the below.

Exploring GIS Data File Formats
Previewing GIS data Using the Catalog View
previewing metadata & projections
previewing features
Examining GIS Data Coordinate systems

Importing and Exporting Data in the Project Geodatabase
Importing (copying) Geodatabase Feature Classes into the project geodatabase
For this tutorial, we are working with vector data which is a spatial data format that uses points, lines, and polygons to represent real features on the earth's surface. Vector data is ideal for discrete themes with definite boundaries. A Feature Class is a vector storage data format that represents a homogeneous collection of common features. There are two types of Feature Classes: Shapefile feature class and a Geodatabase feature class. A Shapefile feature class is an open source format. Its file extension is .shp and its icon is green. A Geodatabase feature class is an Esri proprietary format. A Geodatabase feature class must be stored inside a Geodatabase (.gdb) and its icon is white. To better organize our project, we will import the data we downloaded and the NHGIS sample data into our Project Geodatabase.
- In the Catalog pane, click the US_tract_1980_Harris_County geodatabase feature class located in the NHGIS folder and drag-and-drop it up into the Intro_Part2.gdb. A progress bar will appear that reads 'Copying...' Once it is complete, you will see a copy of US_tract_1980_Harris_County inside the Intro_Part2.gdb.

- Repeat the above step to drag-and-drop Major_Rivers from the Major_Rivers.gdb into the Intro_Part2.gdb.
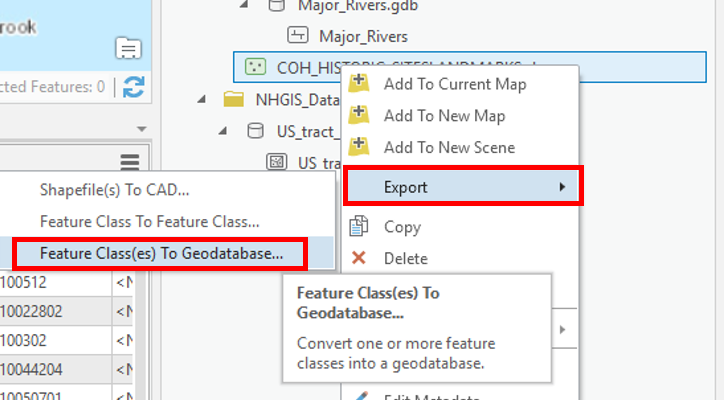
- COH_HISTORIC_SITESLANDMARKS is a Shapefile feature class, so it requires a different method to be imported into the Project Geodatabase. In the Catalog pane, right-click on COH_HISTORIC_SITESLANDMARKS.shp and select Export > Feature class to geodatabase.
- Accept default settings as shown below and click Run.

- Right-click on Intro_Part2.gdb and select Refresh.

- Your Project Geodatabase should now look like the below image.

- In the Catalog pane, in the Folders section, right-click on Downloads and select Remove.

Importing (converting) shapefiles into the project geodatabse
...
Disconnecting from your Downloads folder
Topics to talk about
Exploring GIS Data File Formats
Previewing GIS data Using the Catalog View
previewing metadata & projections
previewing features
Examining GIS Data Coordinate systems