...
- On the Desktop, double-click the Computer icon → gisdata (\\fon-gis04) (O:) → Short_Courses → Bringing_Data_Into_ArcGIS_Series → Creating_Vector_Data.
- To create a personal copy of the tutorial data, drag the Editing folder onto the Desktop.
- Close all windows.
Exercise 1a: Creating new points
Opening an existing project
...
- On the Desktop, double-click the ArcGIS Pro icon.
- Enter ____ as username and ____ as password and click Sign In.
- Click Open an existing project….
- In the ‘Open’ dialog box, click the Browse button.
- Navigate to the Editing folder on the Desktop.
- Select Vector_data.aprx and click OK to open the project file.
...
To start this exercise, you first need to zoom the map to your area of interest. A spatial bookmark, which is similar to a bookmark in a Web browser, is a way to save frequently used locations on your map so you can easily access them. A bookmark has been created for you containing the map extent in which you will be working.
- Click the Bookmarks menu and select the Visitor center bookmark to zoom you to the area around a visitor center ranger station at the south entrance of Zion National Park.
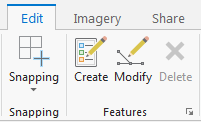
- On the top ribbon menu, click the Edit tab.
- On the Edit toolbar, in the Features group, click the Create button.
The ‘Create Features’ window will open to the right of the Map Display.
4. In the ‘Create Features’ window, click the Ranger stations point feature template
...
This sets up the editing environment so that you will be creating new point features in the Ranger stations layer.
These feature templates were created for you and saved in the tutorial map document. In a later tutorial exercise, you will create feature templates yourself and modify their properties.
5. Underneath the Ranger_Stations features template, make sure that the Point tool is selected. 
6. Using the aerial imagery as your guide, click once on the visitor center building in the center of the display to place a point directly over the visitor center, as shown below.
...

Since you are creating points, clicking the map once adds the feature. If you were drawing lines or polygons, however, you would need to use more than one click so you could create segments in between vertices. Notice that the center of the symbol is highlighted with a solid, cyan color (light, bright blue). By default, as soon as you create new features when editing, they are selected. This allows you you to easily identify the new feature and add attribute values to it.
7. On the Edit toolbar, click
...
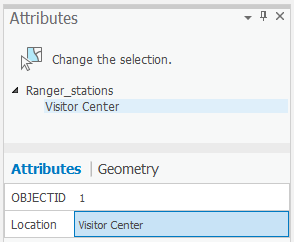
the Attributes button. 
Using the ‘Attributes’ window is a quick way of updating the attribute values of one or more selected features when you are editing. The top of the window shows a hierarchy of the name of the layer and, underneath it, an identifier for the individual feature from that layer. The bottom of the window shows the field (a column in a table) names and the attribute values (a row in a table) for the feature.
8. For the ‘Location’ attribute value, click the blank box which is currently blank or <Null>.
9. Type “Visitor Center” and press Enter.
This action stores the attribute values for that feature. Notice that the entry for the feature on the top of the window is no longer a generic number but has been replaced with the more descriptive Visitor Center, as show below.
10. Close the Attributes window.
You have now completed the first exercise and created a new point feature. In the next exercises, you will learn how to create new lines and polygons.
11. To stop creating new features, close the Create Features window and your mouse will no longer be the Ranger stations symbol.
Exercise 1b: Digitizing lines and snapping
...