...
- On the Desktop, double-click the Computer icon → gisdata (\\fon-gis04) (O:) → Short_Courses → Bringing_Data_Into_ArcGIS_Series → Creating_Vector_Data.
- To create a personal copy of the tutorial data, drag the Editing folder onto the Desktop.
- Close all windows.
Exercise 1a: Creating new points
Opening an existing project
In this exercise, you will use an aerial photograph to create a new point feature representing a park ranger station in Zion National Park. Once the feature is created, you will then add attribute values to the point. You are introduced to the Editor toolbar, the Create Features windowpane, and the Attributes windowpane, which are the main elements of the ArcMap ArcGIS Pro user interface when editing.
- On the Desktop, double-click the ArcGIS Pro icon.
- Enter ____ as username and ____ as password and click Sign In.
- Click Open an existing project….
- In the ‘Open’ dialog box, click the Browse button.
- Navigate to the Editing folder on the Desktop.
- Select Vector_data.aprx and click OK to open the project file.
...
- Click the Bookmarks menu and select the Visitor center bookmark to zoom you to the area around a visitor center ranger station at the south entrance of Zion National Park.
- On the top ribbon menu, click the Edit tab.
- On the Edit toolbar, in the Features group, click the Create button.
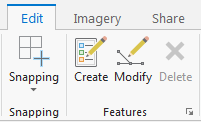
The ‘Create Features’ window pane will open to the right of the Map Display.
4. In the ‘Create Features’ windowpane, click the Ranger stations point feature template
...
In this exercise, you learned how to set up snapping and use it to help you digitize a new road that connects to existing roads.
Exercise 1c: Creating new feature templates
...
You are now ready to create features using the properties specified in this feature template.
Exercise 1d: Creating new polygon features
...
The new features have been created with the default attribute values (Private) specified in the template. If you wanted to add other information, such as ID numbers, you would select the features and type the values into the ‘Attributes’ window.
Exercise 2a: Defining new types of features to create
...
Now that you have added a feature template for the new type, you are ready to start creating features.
Exercise 2b: Creating features from existing features
...
In this exercise, you used an editing command, Buffer, to generate a feature from an existing feature
Exercise 2c: Editing polygon features
...
In this exercise, you learned how to clip polygons and split them by tracing along an overlapping line feature.
Exercise 2d: Editing vertices and segments
...