...
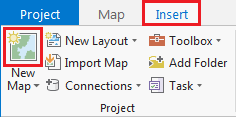
- On the Ribbon, click the Insert tab.
- In the Project group, click the New Map button.
You will notice that a new map view Map View opens in the main section of ArcGIS Pro. The panel on the left side of ArcGIS Pro is called the Contents pane. After creating a new map, the Contents pane now displays the default Map title and automatically adds the Topographic basemap layer to the map. The panel on the right side of ArcGIS Pro is called the Catalog pane. After creating the first map, a new Maps section has been added to the top of the Project tab within the Catalog pane. - In the Catalog pane, click the arrow to expand the Maps section.

Notice that there is a single map there, named Map. Since most projects will have multiple maps, it is a good idea to name your maps with more descriptive titles. - In the Catalog pane, under the Maps section, right-click Map and select Rename.
- Type "GISWorkshop" and hit Enter.
...
- In the Catalog pane, expand the Databases section.
- Right-click PlayMapping.gdb and select New > Feature Class.
- Name it "HSTPoints".
- Under the Type drop-down box, select Point.
- Click Next twice.
- In the Spatial Reference section, under the Layers section, select the NAD 1927 projection.
- Click Next twice again.
- Click Finish.
- If the new feature class did not automatically iadd to your map: From the Catalog pane in the Databases section, expand PlayMappping.gdb. Right-click HSTPoints and select Add to Current Map.
- In the Contents pane, right-click HSTPoints and select Attribute Table.
- From the top of the attribute table, click the Add Field button.

- A new Fields view table appears. In the third row of the Field Name column, type "Thickness".
- Change the Data Type to Short Integer by clicking the drop-down box then selecting Short.
- From the Ribbon, in the Fields tab, click the Save button.
- Close the Fields view table by clicking the X at the top right corner of the table.
- From the Ribbon, select the Edit tab.
- In From the Edit tab, in the Features group, click Create. A new pane, Create Features, opens on the right side of the screen. Click

- From the Create Features pane, click HSTPoints and select the Point button (first in list).

- In the Map viewView, click to add a point on the topmost left point displayed on the HST.jpg.
- In the Attribute Table, a new row has been generated for this newly created point. Click in the Thickness cell for this row and type 7.
- Repeat steps 14 and 15 for all points on HST.jpg.
- From the Ribbon, in the Edit tab, in the Manage Edits group, click Save. Click Yes for the pop-up window.
- Close the Create Features pane.
- Close the Attribute Table.
- Above the Ribbon, on the Quick Access toolbar, click the Save button.
...