| Info |
|---|
This guide was created by the staff of the GIS/Data Center at Rice University for the custom course - ESCI 545 Hydrocarbon Systems Analysis - and is to be used for individual educational purposes only. The steps outlined in this guide require access to ArcGIS Pro software and data that is available both online and at Fondren Library. The following text styles are used throughout the guide: Explanatory text appears in a regular font.
Folder and file names are in italics. Names of Programs, Windows, Panes, Views, or Buttons are Capitalized. 'Names of windows or entry fields are in single quotation marks.' "Text to be typed appears in double quotation marks." |
| Info |
|---|
| Info |
|---|
| Course Objective: Use GIS workflows to collate and synthesize datasets to create geologic and play elements maps that will be used in petroleum system and risk analysis of potential opportunities and plays. |
Table of Contents
Getting Started
For more practice navigating the ArcGIS Pro interface, check out our short course: Introduction to ArcGIS Pro
Creating a New Project in ArcGIS Pro
- From the Start menu, launch ArcGIS Pro.
- When ArcGIS Pro opens, under the New Blank Template section, click the Map project template.
- In the 'Create a New Project' window, for Name, type "PlayMapping".
- For Location, click the Browse... button to the right.
- In the 'Select a folder to store the project.' window, click Computer in the left column and click Desktop in the right column and click OK.
- In the 'Create a New Project' Window, click OK.
- Maximize the ArcGIS Pro application window.
...
- In the Catalog pane, expand the Databases section.
- Right-click PlayMapping.gdb and select New > Feature Class.
- Name it "HSTPoints".
- Under the Feature Class Type drop-down box, select Point.
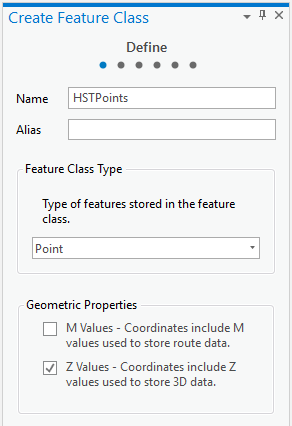
- Click Next twice.
- In the Spatial Reference section, under the Layers section, select the NAD 1927 projection.
- Click Next twice again.
- Click Finish.
- If the new feature class did not automatically iadd to your map: From the Catalog pane in the Databases section, expand PlayMappping.gdb. Right-click HSTPoints and select Add to Current Map.
- In the Contents pane, right-click HSTPoints and select Attribute Table.
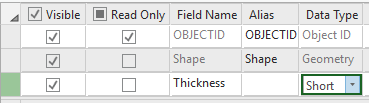
- From the top of the attribute table, next to the Field: section, click the Add button.

- A new Fields view table appears. In the third row of the Field Name column, type "Thickness".
- Change the Data Type to Short Integer by clicking the drop-down box then selecting Short.
- From the Ribbon, in the Fields tab, click the Save button.
- Close the Fields view table by clicking the X at the top right corner of Fields: HSTPoints.
- From the Ribbon, select the Edit tab.
- From the Edit tab, in the Features group, click Create. A new pane, Create Features, opens on the right side of the screen.

- From the Create Features pane, click HSTPoints and select the Point button (first in list).

- In the Map View, click to add a point on the topmost left point displayed on the HST.jpg.
- In the Attribute Table, a new row has been generated for this newly created point. Click in the Thickness cell for this row and type "7".
- Repeat steps 19 and 20 for all points on HST.jpg.
- From the Edit tab, in the Manage Edits group, click Save.
- Click Yes for the 'Save all edits?' pop-up window.
- In the Edit tab, navigate to the Selection section and click the Clear button to unselect any points.
- Close the Create Features pane.
- Close the Attribute Table.
- Above the Ribbon, on the Quick Access toolbar, click the Save button.
Interpolation
This sections steps through how to interpolate a raster surface from points using a natural neighbor technique. For more practice with Interpolation, check out our short course: Data Interpolation and Extraction. For more information on Natural Neighbor Interpolation in ArcGIS Pro, check out this tool reference: Natural Neighbor (Spatial Analyst)
...