...
- Media Bin: In the upper left-hand corner there are several options for the things you can add to your project. The media bin shows you what is available depending on which option is selected. When Media is selected, the media bin displays the imported clips you have so far. If you were to select another option such as Transitions, then those options would appear in the media bin.
- Timeline: At the bottom of the interface is what is known as the timeline. Here, you can choose where to start playing your project using the playhead, move existing clips and effects around, and do most of your editing.
- Canvas: The main display above the timeline is the canvas, where you can preview your project as it would appear when completed. The frame displayed in the canvas is determined by where your playhead is in the timeline. In the canvas, you also have the capability to move windows and graphics around.
NOTE: If you dont want to edit your project, you can skip the following section and jump straight to Exporting your recording. You can use different video editing software, such as iMovie or Final Cut Pro X, to edit your recording later if you want.
Basic Editing:
Camtasia allows you to do most of the basic video editing tasks needed in a very straightforward manner. Let's look at how you can edit your video in the same order we looked at the layout.
...
- Choose from the menu what you wish to add to your project.
- Select specifically which clip/effect/transition you want to add under that category. Notice that when you click on an option, a preview pops up above it in the mini-preview window, giving you a better idea of what you will adding to your project and how to use it.

- Once you have selected the desired media to be inserted, simply "drag-and-drop" the item into your timeline to add it to your project. Different items, depending on what they are, can be added to empty space in the timeline, on top of existing clips, or between clips.
...
- Adding Clips - As mentioned before, everything works in a "drag-and-drop" fashion. Clips can be placed one after the other, or on top of each other to be played simultaneously.
- Moving Clips - Click and drag any clip to any location on the timeline
- Moving the Playhead - To move the play head, click on the black or dashed gray rectangle just above the time markings at the top of the timeline. You can also click and scroll with the playhead, allowing you to see in the canvas where you are. Pressing the Spacebar will play and stop your project from wherever the playhead is.
- Splitting a Clip - Any clip can be split into two, allowing you to delete, move, separate, or add an effect to a specific section. Move the playhead over the clip that you want to split exactly where you want to split it, and then right-click on said clip and choose "Split at Playhead".
- Separating Audio and Video - If you just want the video or audio of a clip to remove or edit, right-click on a clip that has both and select the "Separate Video and Audio" option. This will split the two into separate clips, where you can then delete one or the other, or move them to different locations on the timeline.
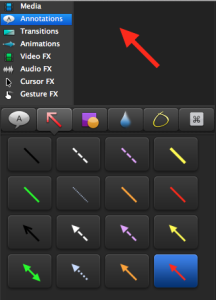
This screenshot includes the most common editing procedures and how they will appear on the timeline. Clips and effects appear differently on the timeline, depending on what they are:

- Media - Appears with a thumbnail of the first frame followed by the name of the clip. If audio is present, you will see the audio waves on the clip.
- Annotations - Once dragged in, will appear above the desired clip. For instance, the track clip with the red arrow is an annotation. From there, you can shorten or increase the duration of the annotation, and move it left and right so that it starts and ends at the proper time.
- Transitions and Animations - These will appear inside of the clip they are affecting, such as the blue arrow you see at the end of the last clip in the screenshot. By dragging the beginning or end of the graphic, you can determine how long the transition or animation will last.
- Video, Audio, Cursor, and Gesture FX - These can be dragged onto a clip where they will appear to be hidden underneath said clip. To expose them, click on the little arrow that shows up in the middle of the affected clip, and then the name of the effect will appear in a little rectangle which can then be shortened, lengthened, and moved by dragging the edges. The example of this is shown in the second clip in the screenshot, which appears to be elevated. Underneath, you can see the green rectangle which says "Left Click Rings" (the desired cursor effect in this example), and below that a small white arrow which if pressed, will hide the effect rectangle and return the clip to its normal position on the track.
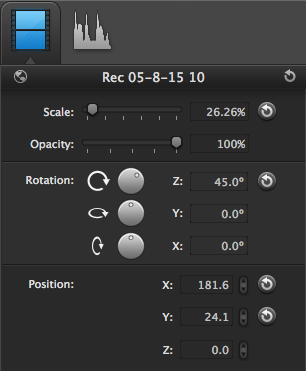
Editing in the Canvas:
- Anything added to the canvas can be moved by clicking and dragging it in the canvas window.
- If you want to re-size or adjust items on the canvas, you can do so either by clicking the small white circles that appear on the edges of canvas items and clicking and dragging, or by using the options shown on the right of the canvas after clicking on the item you want to adjust.
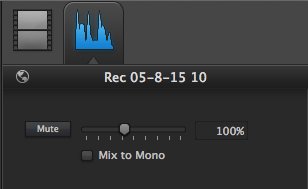
- Similarly, if you want to adjust the audio, select the audio editing tab after clicking on the item in the canvas.
Exporting:
- Once you are satisfied with your project and have watched it from beginning to end, you can export it. To do so, click on "Share" at the top of the screen:
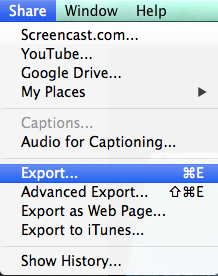
- From here, you can choose to export it directly to several different programs such as Youtube, in which you'll need your login information to do so. However, a regular export is the most common and will convert project into a file you can then view from your computer and send or upload in whichever way you choose.
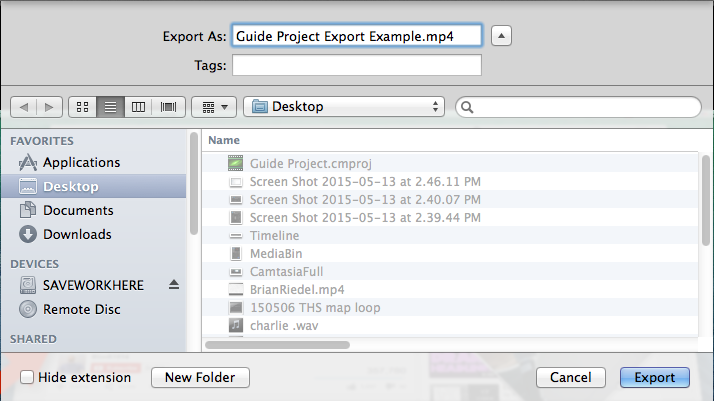
- Click on "Export...". For most users, the default settings are enough to satisfy expectations and produce a quality video worth sharing. Name your file and then choose the location on your computer (such as your desktop or SaveWorkHere folder) where you wish your project to be saved.
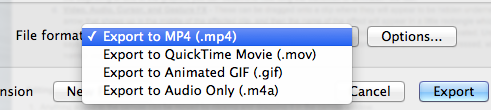
- If you have specific requirements and wish to access more advanced settings, then you can choose "Advanced Export...", where you can select the format you want your file in and other specifications under "Options...", such as the frame rate, dimensions, and quality of your video. (Note: You can choose the resolution of the exported video, but the only way to enhance the quality of the actual footage captured is by choosing a larger, thereby more resolute, capture area in the recording phase.)

To learn more about Camtasia features, within Camtasia window, go to Help and you can search for answers and visit Camtasia Course. Have fun!!
