...
This view displays a list of all the fields, along with their field properties. In the Field Name column, locate the Land.LAND_USE_C field. To the right, in In the Data Type column to the right, notice that the data type is Long, which stands for long integer. In other words, the data is stored in a numeric field. Further down, locate the LandUseCode_LookupTable.LANDUSE_CODE field. To the right, notice that the data type is Text. Even if the 4-digit codes stored in both fields are identical, the join will not work if one table stores the values as text and one stores the values as numbers. If the data types in both fields had matched, then the join error would likely have been due to the actual data (or 4-digit codes) being different or selecting the incorrect column name on which to perform the join.
In order to successfully perform a join, the corresponding join fields in the respective both tables must be of the same field type. Unlike in Excel, you cannot simply convert an existing field from one type to another. Instead, you must create a new field of the correct field type and copy the data over into the new field. In this case, you will convert the LAND_USE_C field in the Land table to a string text field type to match the string text field type used in the LandUseCode_LookupTable table.
- In the Catalog pane, right-click the Land table > and select Design > Fields.
- At the bottom, click ‘Click ‘Click here to add a new field’field.’
- For ‘Field Name’, type “LAND_USE_C_Text” and press Enter.
- For ‘Data Type’, click once to highlight Long and activate the field and then click Long a second time and use the drop-down menu to select Text instead.
- On the ribbon, the Fields tab , click Save.should now be active. In the Changes group on the far right, click the Save button to save the changes to the design of the Land table fields.
The The new LAND_USE_C_Text field has now been added to the end of the Land table.
- Close the ‘Fields’ window both table Fields: views.
- In the Catalog pane, right-click the Land table and select Open.
- Right-click the LAND_USE_C_Text field name and select Calculate Field.
Over the Catalog On the right, in the Geoprocessing pane, the Calculate Field geoprocessing pane tool will appearopen.,
- In the Fields menulist, double-click the LAND_USE_C field.
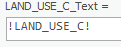
Notice that the box at the bottom of the ‘Field Calculator’ pane below now reads LAND_USE_C_Text = [!LAND_USE_C]!, as shown below. This statement will copy all of the content from the original LAND_USE_C integer field to into the new LAND_USE_C_Text text field.
...
- Click Run.
Ensure that the land use codes have, indeed, been copied over into the new LAND_USE_C_Text field and that they are left-aligned as text, rather than right-aligned as numbers.
- Close the attribute tables.
...
- In the Contents pane, right-click the DowntownParcels layer name and selectJoins and Relates > Remove Join(s) > Remove All Joins.
You will now repeat the process of joining both tables.
- In the Contents Pane, right-click the DowntownParcels layer and select Joins and Relates > Add Join.
- For ‘Input Join Field’, select the HCAD_NUM field.
- For ‘Join Table’, select the Land table.
- For ‘Output Join Field’, select the ACCOUNT field.
- Ensure that the ‘Add Join’ pane matches that shown below and click OK.
...
In the Geoprocessing pane, the Remove Join tool will open.
- For 'Layer Name or Table View', leave the default DowntownParcels layer selected.
- For 'Join', use the drop-down menu to select the LandUseCode_LookupTable table.
You will now repeat the process of joining the lookup
...
table.
- In the Contents pane, right-click the DowntownParcels layer and select Joins and Relates > Add Join.
- For ‘Input Join Field’, select the new Land.LAND_USE_C_Text field.
- For ‘Join Table’, select the LandUseCode_LookupTable table.
- For ‘Output Join Field’, select the LANDUSE_CODE field.
- Ensure that the ‘Add Join’ pane matches that shown below and click OK.
...
- Right-click the DowntownParcels layer and select Attribute Table.
- Scroll In the DowntownParcels table view, scroll to the right and browse through all of the attributes.
Notice that the generalized group code and description fields have been added to the end of the attribute table.
- Close the DowntownParcels attribute table.
- In the toolbar at the top of the document, click Save.
...