...
Geoprocessing tools are used to update and analyze data based on particular criteria. The majority of geoprocessing tools generate a new feature class that differs from the input feature class(s) either in feature geometry or tabular attributes or both. In this tutorial you will use geoprocessing tools to generate information that could be used for a collaboration between the Houston Police Department (HPD) and the Houston Independent School District (HISD).
Merge
The first set of data you will be working with contains the Houston Police Department ( HPD ) beat boundaries. Though it has been modified for the purposes of this tutorial, the original data was obtained from the City of Houston GIS Database webpage, which is no longer available, but the original data can still be obtained from the GIS/Data Center data collection.
...
- At the top of the Geoproccessing pane, click the Toolboxes tab.
- Click the Data Management Tools toolbox > General toolset > Merge tool.
- In the upper right corner of the ‘Merge’ tool, hover over the help Help button.
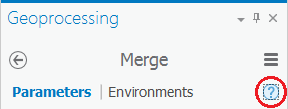
Read the pop-up Merge tool help and review the sample illustration. Notice that this tool merges two like datasets covering different geographic extents together into a single dataset. Clicking on, rather than hovering over, the help button will open the full tool documentation in your default web browser.
...
- For ‘Output Dataset’, rename the feature class from HPDBeats_South_Merge or HPDBeats_North_Merge to “HPDBeats".
- Ensure that your Merge tool Parameters tab appears as shown below and click Run.

When the tool is finished running, you will see a message at the bottom of the Geoprocessing pane with the name of the tool. A green checkmark indicates that the tool ran successfully. You may also see a yellow warning icon or a red X if the tool has warnings or fails.
- In the Contents pane, right-click the HPDBeats layer and select Attribute Table.
...
- In the Contents pane, right-click the HPDBeats_North layer and select Remove.
- In the Contents pane, right-click the HPDBeats_South layer and select Remove.
- Above the ribbon, on the Quick Access toolbar, click the Save button.
Dissolve
As explained in the tutorial introduction, the collaboration with the schools is going to be based on the police districts, not the police beatsImagine that HPD would like to manage this collaboration based on police district boundaries instead of police beat boundaries. At this point, your HPD layer only displays the police beat boundaries, but its attribute table does tell you the district number corresponding to each beat.
- Scroll down the HPDBeats attribute table view while observing the values in the District field.
Notice that each district contains many beats. You will now dissolve the police beats based on this District field so that all individual beat boundaries within a single district will be dissolved into a single unified district boundary.
- Close the HPDBeats table view.
- At the top of the Geoprocessing pane, click the Back arrow button.
- In the Geoprocessing pane within Within the already expanded Data Management Tools toolbox, click the Generalization toolset > Dissolve tool.
- In the upper right corner of the ‘Merge’ ‘Dissolve’ tool, hover over the helpthe Help button.
Read the pop-up Dissolve tool help and review the sample illustration. Notice that this tool dissolves boundaries based on common field values. In this case, you will dissolve the police beat boundaries based on common district values, resulting in a file showing only the larger district boundaries.
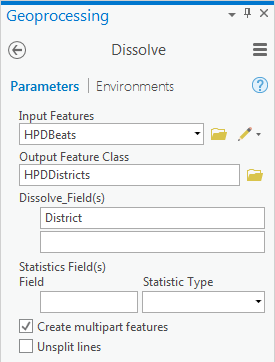
- For ‘Input Features’, use the drop-down menu to select the HPDBeats layer.
- For ‘Output Feature Class’, rename the feature class from HPD_BeatsHPDBeats_Dissolve to “HPDDistricts”.
- For ‘Dissolve_Field(s)’, use the drop-down menu to select the District field, since this is the field containing the common district values you wish to dissolve on.
- Ensure that your Dissolve tool Parameters tab appears as shown below, and click Run.
- In the Contents pane, toggle uncheck and recheck the new HPDDistricts layer to toggle it on and off the map and on to understand the result of the Dissolve tool.
- In the Contents pane, right-click the HPDDistricts layer and select Attribute Table.
Notice that only the dissolve field, in this case the District field, was preserved. Because multiple beats were dissolved into each district, it is not possible to retain all of the attributes of each separate beat.
- Close the HPDDistricts attribute table table view.
Since you only need to use the police districts, you may now remove the police beats layer.
...
Now you will examine the school district boundaries. Though it has been modified for the purposes of this tutorial, the original data can was also be obtained online from the City of Houston GIS Database webpage at http://cohgis.houstontx.gov/cohgis2010/index.html[g2] within the administrative boundary dataset.Database webpage, but can now be obtained from the GIS/Data Center data collection.
- At the bottom of the Geoprocessing pane, click the Catalog tab.
- Within the Geoprocessing geodatabase, right-click the HISD feature class and select Add To Current Map.
...
- At the bottom of the Catalog pane, click the Geoprocessing tab.
- At the top of the Geoprocessing pane, click the Back arrow button.
- Click the Data Management Tools toolbox to collapse it.
- Click the Analysis Tools toolbox > Extract toolset > Clip tool.
- In the upper right corner of the ‘Clip’ tool, hover over the Help button.
Read the pop-up Clip pane tool help and review the sample illustration. Notice that this tool clips one dataset to the extent, or shape, of another dataset.
- For ‘Input Features’, use the drop-down menu to select the HPDDistricts layer.
- For ‘Clip Features’, use the drop-down menu to select the HISD layer.
- For ‘Output Feature Class’, rename the feature class from HPDDistricts_Clip to “HPDDistricts_HISD” and click Run.
- In the Contents pane, uncheck the HPDDistricts layer.
Notice that the resulting HPDDistricts_HISD layer maintains the police district boundaries, but limits the extent of the districts to the extent of the HISD boundary. You no long longer need the full extent police districts layer and may remove it.
- In the Contents pane, right-click the HPDDistricts layer and select Remove.
...