...
- Click Workshop_Data.zip above to download the tutorial data. Make a note where this file is saved on your personal computer.
- Open your Downloads folder.
- Right-click Workshop_Data.zip and select Extract All....
- In the Extract Compressed (Zipped) Folders window, accept the default location into the Downloads folder.
- Click Extract.
...
- In the Catalog pane, click the arrow to expand the Databases section.
- Click the arrow to expand the PlayMapping.gdb geodatabase. You will notice there is no data in the project geodatabase. Over the next few sections, we will create data that is added transfer and generate data to this Project Geodatabaseproject geodatabase.
- In the Catalog pane, click the arrow to expand the Folders section. Again, notice there is no data in the folder.
...
- In the Catalog pane, click-and-hold the geologic_features_poly geodatabase feature class from the SpatialJoinData.gdb and drag-and-drop it up into the PlayMapping.gdb. A progress bar will appear that reads 'Copying...' Once it is complete, you will see a copy of geologic_features_poly inside the PlayMapping.gdb.
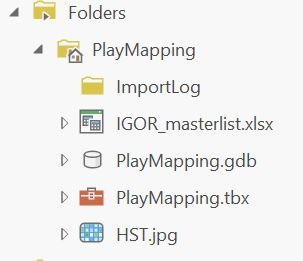
- In the Catalog pane, click-and-hold the HST.jpg from the Workshop_Data folder and drag-and-drop it up into the PlayMapping project folder.
- In the Catalog pane, click-and-hold the IGOR_masterlist excel file from the Workshop_Data folder and drag-and-drop it up into the PlayMapping project folder.
- In the Catalog pane, in the Folders section, right-click on Downloads and select Remove.
- Your PlayMapping project folder should look like the below image.
Adding Data to a Map
...