...
- In a web browser, go to https://apps.nationalmap.gov/downloader/.
First, you will select the data products you are interested in viewing and downloading.
- On the left side bar, under the 'Data' section, check the Elevation Products (3DEP) section to expand it.
- If necessary, within the 'Subcategories' section, check1/3 arc-second DEM.
Notice that GeoTIFF, IMG is the only file format available for this type of data.
...
constrain your downloads to your area of interest.
- In the 'Area of Interest' section, use the 'Map Extent/Geometry' drop-down menu button to select Selectable Polygon.
- Use the 'Select...' drop-down menu to select 8-digit HU (Subbasin).
- At the top right of the map, in the 'Find address or place' search box, type “Houston” and press Enter.
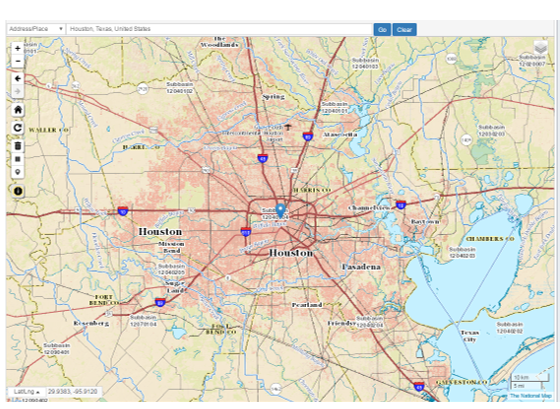
After zooming into Houston, you can see the blue boundaries of the individual subbasins and each subbasin is labeled with its HUC-8 number on the map.
- Near the center of the map, click within Subbasin 12040104 to select it.

Your data search will now be constrained to the polygon for subbasin 12040104.
Next, you will select the data products you are interested in viewing and downloading.
- On the left side bar, under the 'Data' section, check the Elevation Products (3DEP) section to expand it.
- If necessary, within the 'Subcategories' section, check1/3 arc-second DEM.
- Under the 'File Formats' section, select All, which will make the ArcGrid file format available (rather than only the GeoTIFF and IMG file formats)
- Scroll back to the top of the left side bar and click the Search Products button.

...
You are now provided with a listing of all the DEM tiles covering the area of
...
subbasin 12040104. Although 12 results are listed, there are only 3 areas of coverage provided in 4 different file formats: ArcGrid, GeoTIFF, GridFloat, and IMG. You will download only the 3 files in the ArcGrid format
- In turn, click Download ZIP for USGS NED 1/3 arc-second 1 x 1 degree ArcGrid 2019 for n30w096, n30w095, and n31w096.


- Once all files have finished downloading, navigateNavigate to the location where the three zipped folders have been downloaded. The downloads may take a few minutes to complete.
- Select and copy all three zipped folders.
- Using Windows Explorer, navigate to your HydrologyLab folder.
- Paste all three zipped folders directly inside your HydrologyLab folder. Do NOT paste them inside the HydrologyLab.gdb geodatabase folder.
- Select all three zipped folders.
- Right-click any of the three selected folders and select 7-Zip → Extract to “*\”, which will create one unzipped folder for the contents of each zipped folder. (If you are on a personal computer without 7-Zip installed, then right-click each folder in turn and select Extract All. Leave the default location, which is the same location as the original zipped folder, and click Extract.)
- Return to ArcGIS Pro.
Since you just added new files to your folder, you will need to refresh it in order for them to appear in appear in the Catalog pane.
- At the bottom of the Geoprocessing pane, click the Catalog
...
- tab.
- Click the Project tab on the Catalog pane.
- Double-click Folders > HydrologyLab.
- If you do not see your newly download folders, right-click the Right-click your HydrologyLab folder and select Refresh.
- Expandn30w095 and the other all three USGS folders to preview their contents.
...
- Drag the grdn30w095_13 raster into the Map Display Lab2 map view.
You will be asked if you would like to create pyramids. Pyramids cache the raster at multiple reduced resolutions, resulting in an increased file size, but better rendering performance in your Map Displaymap view. It is normally a good idea to create pyramids, but since you will be processing the corresponding rasters into a new file in the next step, you will not create pyramids at this time.
- In the 'Build pyramids' window, click No.
- Repeat Steps 1 and 2 the previous two steps with the grdn30w096_13 and grdn31w096_13 rasters.
...
- In the Contents pane, double-click the grdn31w096_13 layer to open the 'Layer Properties' window.
...
- In the Source tab, expand the 'Spatial Reference' section. scroll down and notice the spatial reference is listed as GCS_North_American_1983. Since this coordinate system is not the same one currently used by the data frame, the raster layer is being projected-on-the-fly into the State Plane Texas South Central projection.
Mosaicking raster files
The edges where the three tiles meet are currently visible, because the minimum and maximum elevation is different in each raster, causing the same value to be represented with a different shade of gray in each raster. To solve that visual problem and also simplify future processing steps, you will mosaic the three rasters into a single raster.
...