Scanning to PDF:
- Turn on the DocuMate 152 scanner. The power switch is located on the back side of the machine.
- On the bottom right hand corner of the computer screen you will see an icon for OneTouch that looks like this -->
 . Click on it, and a small window will slide up with multiple options. Select option #2 for PDF.
- The scanner will run a scan and say there are “No documents in ADF”. That is ok, because you want to pick the right settings before scanning your documents. The white portion of the window has the specifications of the scan (color, duplex, DPI, page size etc). If the settings are correct, skip to step 6. Otherwise, double-click on the white portion of the window to open up the settings.
- A window like this will appear. You can select a pre-configured setting on the right scroll menu. After selecting the setting you want, you can click “Apply” and then double check in the bottom right hand corner of the screen to make sure the settings are correct. If they are, click “OK”.

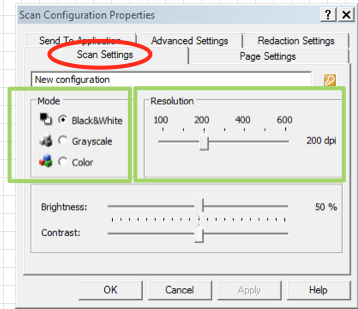
- If you’d like to create your own setting, here’s how to do it. Otherwise, skip to the step 6. Select “New…” and a new window will pop-up. From here, you can name your new setting and select the mode and resolution in the Scan Settings tab. In the Page Settings tab, you can select “Duplex” for double-sided scanning, or leave it un-checked for singe sided document scanning


Once you’re done with the new settings, click “Apply”, double-check it as stated in step 4, then click “OK”.
- Now you are ready to scan. Place your documents face down and top down into the scan tray. This is to avoid re-orienting them later. The feeder should grab the first page, indicating that it is ready to go. Click on this icon -->
 to begin scanning.
- After scanning the documents, Adobe Acrobat Pro should automatically open up within a few moments with the files you just scanned. From here, be sure to save your file in another location, such as the desktop or your SAVE WORK HERE folder.
 . Click on it, and a small window will slide up with multiple options. Select option #2 for PDF.


 to begin scanning.
 . Click on it, and a small window will slide up with multiple options. Select option #2 for PDF.


 to begin scanning.