Introduction
Scanning technology allows you to scan a printed image, a picture or text, into a computer file. By using Optical Character Recognition software, you may transform a paper document into an electronic file for use in a word processing program or on the web. OCR also allows you to incorporate printed images and text into electronic documents.
Currently, the Digital Media Center scanning facilities consist of PC and Macintosh workstations equipped with document and flatbed scanners and software OmniPage Pro 15.0, for scanning and recognizing text. This software is particularly good for multilingual documents, documents with columns, and documents written in certain non-Western European languages.
Recognition Accuracy
Optical Character Recognition (OCR) converts scanned images into text. It works well on most 20th-century and 19th-century typefaces. With earlier printed material, or with poor reproductions of any typeface, the OCR software begins to encounter time-consuming obstacles. Broken letters, ligatures, digraphs, uneven inking, and antiquated letters may not be recognized by the software, and each unrecognized character adds time to the proofing and correction stage of your project.
Even though 95% accuracy seems quite good and 99% accuracy looks excellent, remember that this is a measure of accuracy per character. So, 95% accuracy actually translates into accurate recognition of 1 in 20 characters. Given an average word length of 5 characters, this is a mistake every 4 words. Even 99% accuracy means 1 character in 100, or one word in 20 is incorrect.
Anything that disrupts the integrity of the letter's shape can be a potential cause of an error, although the software has some ability to compensate. Breaks in letters (and sometimes ornate italics) can cause what you will come to recognize as distinctive OCR errors. For instance, a d getting read as cl, a 1 or ! as l, an m as in, or an e as c.
You can enhance accuracy by using clear text or photocopies. A new book will scan best. Books in relatively good condition will always scan better than photocopies. A little experimenting at first can result in a lower error rate (and therefore less to correct in proofreading). Your results should be good with most modern type faces, but even with clean text of a decent type size there will be occasional errors; this error rate increases as the text's size and clarity decreases. Altering the brightness and resolution can improve results, but little can be done with a badly faded photocopy or a 17th or 18th century typeface.
Scanning Text with OmniPage Pro
OmniPage Pro provides a wide range of options, including the ability to learn new characters, to scan only parts of documents (Manual Zone), to spellcheck, to recognize most European character sets as well as multilingual documents, and to save the resulting text in a variety of popular word-processing formats.
The DMC recommends that you scan your document to PDF (using another program), then use OmniPage Pro to convert it to an Office document. The simplest way to create a Word document in OmniPage Pro…
Open OmniPage Pro 15.0. Near the top left, under the menu, is a toolbar comprised of buttons. To change the options for your document (e.g. language, speed, proofing etc.), click on the Options button. This will bring up the following box, in which you can find the various options.

After you have chosen your language, source, etc., you can begin the OCR process.
Below the main toolbar is a series of buttons with drop-down menus. Set the first drop-down menu to 1 - 2 - 3, and click on the button above it.

Set the second drop-down menu to Load Files, and click on the button above it. Find your scanned document in the pop-up box, and hit OK. Wait for it to load.
From the third drop-down menu, select your document type. Click on the button above the drop-down menu, and wait for it to run OCR.
- - This drop-down menu allows you to specify the contents of your document—columns, tables, form fields.
- - If you choose Automatic from this menu, the program will automatically recognize the objects in your document.
- - It is also possible to manually designate different areas of your document as different recognition “zones”. The toolbar in the left of the window has options to select text zones, table zones, process zones, ignore zones, etc.
- - The button with the small "a" allows you to draw process zones. The button with the small "x" is for ignore zones.
- - The button with the small "t" is for different types of process zones. If you click on it and hold, more buttons will appear for text, table, graphic, and form.

- - Once you have drawn a zone, you can also adjust the type of zone by right-clicking in the selected area.
- - If your file is a form, you can designate the different types of fields manually. If it contains tables, you can edit the dividers in your table in OmniPage.
From the fourth drop-down menu, choose Save to File, and hit the button above. In the Save window, choose what kind of document to save it as. Choose a location and a name. Hit OK.
- - The document can be exported as different types of Office documents. The two most common are Word and Excel.
- - It is important to choose the right file format for export; otherwise your document may not retain its zone recognition. Choose the format that is most compatible with the software with which you will use the document.
- - For Word, the best type is Microsoft Word 97 (*.doc).
- - If you want to maximize compatibility of a text file, it may be simpler to simply export as a Rich Text File (*.rtf). This file contains only unformatted text.
- - If you want to create a PDF to use in Acrobat, we recommend PDF with image on text (*.pdf). This will allow you to create a searchable PDF. It is especially helpful when using Acrobat in highlighter mode, where highlighted words can be confused for images. This circumvents that problem.
- - You can also export your file for electronic distribution (e-mail).
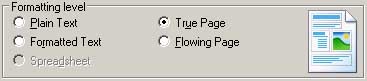
- - There is a section labeled "Formatting level". Here you select the amount of formatting that you would like your finished file to contain.
- - Plain Text--exports plain, decolumnized text in a single font and size. Tables are not supported if you are exporting to text or unicode; most other target file types and applications can read this with tables and graphics.
- - Formatted Text--exports decolumnized text with font and paragraph styling. Formatted Text is supported with nearly all file types.
- - Spreadsheet--exports each page into a new spreadsheet in Excel.
- - True Page--exports a document which retains the original layout of the page. This is the only option for XML and PDF formats (except PDF - Edited).
- - Flowing Page--exports original page layout, with columns, but not with text boxes or frames.
Once you have scanned your document, a proofreading window will appear, marking all “suspect” words for review. Most users prefer to close this window and either proofread later or skip proofreading (for longer documents). To go back and proofread later, go to Tools-->Proofread OCR.
A Final Word
If you are interested in further editing or marking up the text for the Web or in scanning and editing images, ask the Digital Media Center staff for assistance.