...
- Launch Camtasia
- Close existing project or go to File > New Project
- Hit the Record button located on the middle toolbar
- The following window pops up:
- Select recording region:
- Record full screen. By default, Camtasia records the entire screen of your main monitor. Choose this option when your recording content includes:
A large or full-screen application or web browser.
Multiple applications or web browser windows.
Action that spans across the entire screen including the dock, application menus, etc
- Record using a preset when you want to share to a destination that requires specific dimensions such as YouTube, iPhone, or to embed on a website.
- Click on the triangle to the right and choose your desired region from the drop-down menu:
- Click on the triangle to the right and choose your desired region from the drop-down menu:
- Record a custom region. Record a region of the screen when:
You only want to show a specific window or region of the screen, no extra content.
You need to record at specific dimensions.
You want to record at dimensions larger or smaller than one of Camtasia's presets, but still maintain the same aspect ratio of the preset.
- To set your own custom region, choose Custom Region, and click on the crosshairs that appear in place of the "rec" button .
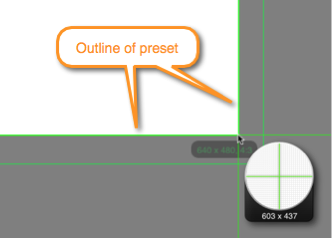
- To select an area, click and drag on the screen. As you drag the cursor near a preset, an outline of the preset appears.
- To select a window, move the cursor over the window until a green border appears around the window. Click within the window to select that area.
You cannot access any applications or system settings while in the selection mode. Make sure to edit the audio settings, application or window position, and other system settings before selecting the area to record.
To cancel selection, click on back arrow or press Esc to edit these items .
- Record full screen. By default, Camtasia records the entire screen of your main monitor. Choose this option when your recording content includes:
- Select camera option: if If you want to use the built-in iSight camera to record youselfyourself, click on Camera to turn in it on. A preview of the camera appears. You will not be able to see yourself once you start to record.Once you begin to record, the preview will disappear, but will become visible again in the editing stage.
- Select audio:
- From the Audio menu, be sure to select Duet USB - NOT Built-in Microphone, as you want to record with the desktop microphones with Duet audio interface.
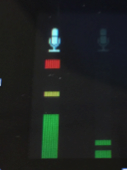
- To adjust the audio input level, speak into the mic at the level you are wishing to record at. At the same time, observe the audio meter on the Duet Apogee interface; Press down the wheel repeatedly to toggle between the 2 different inputs, headphones and speaker level. Adjust the Mic input level (either Input 1 or Input 2 depending on which desktop microphone you use) by turning the wheel clockwise to increase or counter-clockwise to decrease.
- Make sure the bar only goes up about ¾ of the way. If it touches the red square, your mic volume is too high. The input levels should barely be into the yellow part of the bar.
- From the Audio menu, be sure to select Duet USB - NOT Built-in Microphone, as you want to record with the desktop microphones with Duet audio interface.
- System audio: When enabled, this will record anything that comes out of your speakers or headphones directly into Camtasia - whatever you play with iTunes, YouTube, etc.
- Click on red Record button to start recording . The record window will hide, and you will see a count down dialog. When the dialog is gone, the record will start, and you can begin your demo.
...
- Choose from the menu what you wish to add to your project.
- Select specifically which clip/effect/transition you want to add under that category. Notice that when you click on an option, a preview pops up above it in the mini-preview window, giving you a better idea of what you will adding to your project and how to use it.
- Once you have selected the desired media to be inserted, simply "drag-and-drop" the item into your timeline to add it to your project. Different items, depending on what they are, can be added to empty space in the timeline, on top of existing clips, or between clips.
NOTE: Items can be imported into the Media Bin, such as pre-existing images or videos, by selecting File->Import Media.
Working in the Timeline
- The time line may look complicated, but it really isn't! This screenshot includes the most common editing procedures and how they will appear on the timeline. Any clip or effect will appear differently on the timeline, depending on what it is:
- Media - Appears with a thumbnail of the first frame followed by the name of the clip. If audio is present, you will see the audio waves on the clip.
- Annotations - Once dragged in, will appear above the desired clip. For instance, the track clip with the red arrow is an annotation. From there, you can shorten or increase the duration of the annotation, and move it left and right so that it starts and ends at the proper time.
- Transitions and Animations - These will appear inside of the clip they are affecting, such as the blue arrow you see at the end of the last clip in the screenshot. By dragging the beginning or end of the graphic, you can determine how long the transition or animation will last.
- Video, Audio, Cursor, and Gesture FX - These can be dragged onto a clip where they will appear to be hidden underneath said clip. To expose them, click on the little arrow that shows up in the middle of the affected clip, and then the name of the effect will appear in a little rectangle which can then be shortened, lengthened, and moved by dragging the edges. The example of this is shown in the second clip in the screenshot, which appears to be elevated. Underneath, you can see the green rectangle which says "Left Click Rings" (the desired cursor effect in this example), and below that a small white arrow which if pressed, will hide the effect rectangle and return the clip to its normal position on the track.
- Adding Clips - As mentioned before, everything works in a "drag-and-drop" fashion. Clips can be placed one after the other, or on top of each other to be played simultaneously.
- Moving the Playhead - To move the play head, click on the black or dashed gray rectangle just above the time markings at the top of the timeline. You can also click and scroll with the playhead, allowing you to see in the canvas where you are making it easier to quickly scrub through a project and find the right spot. Pressing the Spacebar will play and stop your project from wherever the playhead is.
- Splitting a Clip - One of the most common editing techniques. Any clip can be split into two, allowing you to delete, move, separate, or add an effect to a specific section.


