Camtasia is software used to record onscreen activity, audio and web cam video and narrate existing PowerPoint presentations. Through Camtasia, you can record, edit, produce and share course content.
Tips before start your Camtasia project:
- Clean up desktop
- Write a script or outline
- Do a practice run through
To Record:
- Launch Camtasia
- Close existing project or go to File > New Project
- Hit the Record button located on the middle toolbar

- The following window pops up:
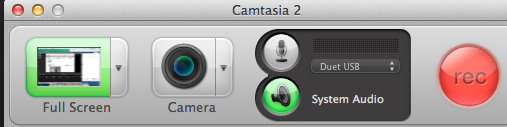
- Select recording region:
- Record full screen. By default, Camtasia records the entire screen of your main monitor. Choose this option when your recording content includes:
A large or full-screen application or web browser.
Multiple applications or web browser windows.
Action that spans across the entire screen including the dock, application menus, etc
- Record using a preset when you want to share to a destination that requires specific dimensions such as YouTube, iPhone, or to embed on a website.
- Click on the triangle to the right and choose your desired region from the drop-down menu:

- Click on the triangle to the right and choose your desired region from the drop-down menu:
- Record a custom region. Record a region of the screen when:
You only want to show a specific window or region of the screen, no extra content.
You need to record at specific dimensions.
You want to record at dimensions larger or smaller than one of Camtasia's presets, but still maintain the same aspect ratio of the preset.
- To set your own custom region, choose Custom Region, and click on the crosshairs that appear in place of the "rec" button
 .
. - To select an area, click and drag on the screen. As you drag the cursor near a preset, an outline of the preset appears.
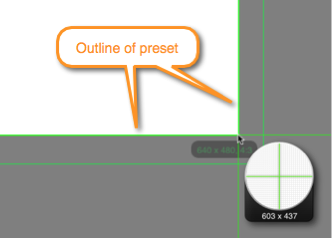
- To select a window, move the cursor over the window until a green border appears around the window. Click within the window to select that area.
You cannot access any applications or system settings while in the selection mode. Make sure to edit the audio settings, application or window position, and other system settings before selecting the area to record.
To cancel selection, click on back arrow or press Esc to edit these items
 .
.
- Record full screen. By default, Camtasia records the entire screen of your main monitor. Choose this option when your recording content includes:
- Select camera option: if you want to use the built-in iSight camera to record youself, click on Camera to turn in on. A preview of the camera appears. You will not be able to see yourself once you start to record.
- Select audio:
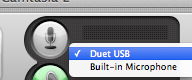
- From the Audio menu, be sure to select Duet USB - NOT Built-in Microphone, as you want to record with the desktop microphones with Duet audio interface.
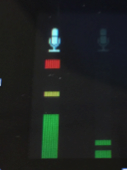
- To adjust the audio input level, speak into the mic at the level you are wishing to record at. At the same time, observe the audio meter on the Duet Apogee interface; Press down the wheel repeatedly to toggle between the 2 different inputs, headphones and speaker level. Adjust the Mic input level (either Input 1 or Input 2 depending on which desktop microphone you use) by turning the wheel clockwise to increase or counter-clockwise to decrease.
- Make sure the bar only goes up about ¾ of the way. If it touches the red square, your mic volume is too high. The input levels should barely be into the yellow part of the bar.
- From the Audio menu, be sure to select Duet USB - NOT Built-in Microphone, as you want to record with the desktop microphones with Duet audio interface.
- System audio: When enabled, this will record anything that comes out of your speakers or headphones directly into Camtasia - whatever you play with iTunes, etc.
- Click on red Record button to start recording
 . The record window will hide, and you will see a count down dialog. When the dialog is gone, the record will start, and you can begin your demo.
To Pause or Stop Recording:
- Go to the upper right corner and click on red filmstrip icon and choose either Stop Recording or Pause Recording.
- Keyboard shortcuts: OPTION + COMMAND + 2 to stop or SHIFT + COMMAND + 2 to pause.
 .
.
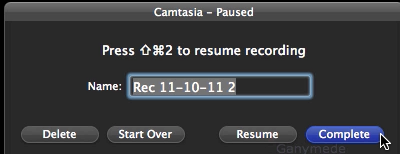
3. Choosing Pause Recording will give you more options such as Delete, Start Over, Resume or Complete your recording. You may also name your recording, though the name of your final project can be decided at the end and can be different than the name you choose here.
Inside Camtasia - The Layout, Basic Editing, and Exporting
The Layout:
Once you have completed your recording, Camtasia will automatically open back up with your new footage inserted into the timeline. Camtasia works very similar to other video editing softwares, but very simplified and user friendly. Here is how the workflow in Camtasia is set-up:
- Media Bin: In the upper left-hand corner there are several options for the things you can add to your project. The media bin shows you what is available depending on which option is selected. When Media is selected, the media bin displays the imported clips you have so far. If you were to select another option, then those options (such as annotations) would appear in the media bin. The other options allow you to add things like effects, graphics, and transitions.
- Timeline: At the bottom of the interface is what is known as the timeline. Here, you can choose where to start playing your project using the playhead, move existing clips and effects around, and do most of your editing.
- Canvas: The main display above the timeline is the canvas, where you can preview your project as it would appear when completed. The frame displayed in the canvas is determined by where your playhead is in the timeline. In the canvas, you also have the capability to move windows and graphics around.
Basic Editing:
Camtasia allows you to do most of the basic video editing tasks needed in a very straightforward manner. Let's look at how you can edit your video in the same order we looked at the layout.
Adding To Your Project
- Choose from the menu what you wish to add to your project.
- Select specifically which clip/effect/transition you want to add under that category. Notice that when you click on an option, a preview pops up above it in the mini-preview window.

- Once you have selected the desired media to be inserted, simply "drag-and-drop" the item into your timeline to add it to your project. Different items, depending on what they are, can be added to empty space in the timeline, on top of existing clips, or between clips.
NOTE: Items can be imported into the Media Bin, such as pre-existing images or videos, by selecting File->Import Media.
Working in the Timeline
- The time line may look complicated, but it really isn't! This screenshot includes the most common editing procedures and how they will appear on the timeline.
