...
- Using Windows Explorer, navigate to the location where you would like to locate your project folder (likely the E: or F: drive).
- Create a new folder inside your selected location and name it “HydrologyLab”. Remember not to use any spaces. Note the full file path of your HydrologyLab folder.
...
Now that you have created a project folder for this lab, you will need to connect to it in the ArcGIS for Desktop environmentcreate a new ArcGIS Pro project in it.
- On the Desktop, click the Start menu and select All Programs -> ArcGIS -> ArcGIS > ArcGIS Pro.
- On the Log-In window, click Configure Your Licensing Options.

- In the ‘Licensing’ window, select Single Use License for License Type, as shown on the following page, once it finishes loading and click OK.

- In the ‘ArcGIS Pro’ window, select Blank.

- In the ‘ArcGIS Pro’ window, select Map.

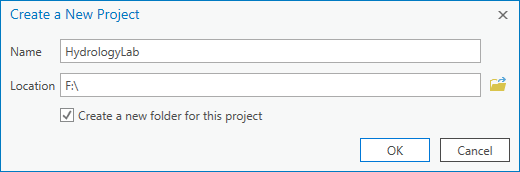
- In the ‘Create a New Project’ window, for 'Name', type "HydrologyLab".
- For 'Location', click the Browse button In the ‘Create a New Project’ window, type HydrologyLab as Name and click the icon to navigate to the HydrologyLab folder created. Once the HydrologyLab folder is selected, click OK.
- Uncheck Create a new folder for this project.
- Click OK.

- In the Insert tab, click ‘New Map’.

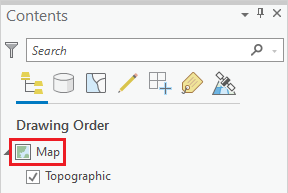
- On Contents pane, click Map name to rename it from Map to Lab1.

Because you created a new project using the Map template, the project opens with a single map already created; however, it is generically named Map, so you will give it a more descriptive name to differentiate it from the maps created in future labs.
- In the Contents pane, click Map once to select it. Then, click directly on the Map text a second time and rename it "Lab1".
Part 2: Mapping Watershed Data
...
Your project folder and geodatabase have been created, so you are ready to download your first set of online GIS data. You will start by downloading data from the National Flood Interoperability Experiment (NFIE), which is searchable on the ArcGIS Online platform.
- In a web browser, go towww.arcgis.com.
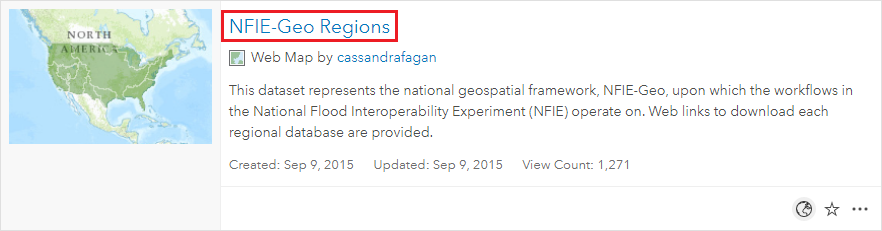
- In the search box in the top right of the website, type “NFIE-Geo Regions”.
If no items are returned, it is likely because you are signed in to your Rice account and the content is limited to Rice University content by default.
- If necessary, in the 'Filters' section on the left sidebar, toggle off Only search in Rice University, at which point the proper layer should appear.

- Click the Click to Open the NFIE-Geo Regions web map to open it in ArcGIS online.
- On the map, click to select the Texas-Gulf region, which encompasses Houston.
- Click More info.
- In the Content section, right-click the NFIEGeo_12.gdb.zip file and select Download.

...