...
You can download the Audacity software for Windows, Mac, or Linux at http://audacity.sourceforge.net/download/.In order to export your audio tracks as MP3 you will also need to download the LAME MP3 Encoder from the link at http or at https://manualwww.audacityteam.org/o/man/faq_installation_and_plug_ins.html - How_do_I_download_and_install_the_LAME_MP3_encoder.3F, or you can go Audacity-> Preferences -> libraries->MP3 library, click download button to go to the download page, or the first time you export mp3 file, Audacity will prompt you to go to download page to download mp3 library and locate it after installation. download/. The software patent on LAME encoding library has expired, so now the LAME library for MP3 export is built-in with Audacity for Windows and Mac.
You can import and export different files with Audacity. However, in order to import and export AC3, M4A/M4R (AAC) and WMA, you will need to install the optional FFmpeg library (this also supports import of audio from video files). Refer to this guide for installation of FFmpeg How do I download and install the FFmpeg Import/Export Library?
Starting a New Project
- Launch Audacity
 .
.
A. On Mac stations if the program is not located on the dock, launch Finder> type "Audacity" in search > double click Audacity. app.
B. On Windows stations go to Start > Programs > Audio Editing > Audacity - Before you begin a project you will need to create a new project name and folder.
A. Open the SaveWorkHereFolder on the desktop and create a new folder titled yourName.
B. From the Audacity header menu, click File > Save Project As. A warning window will appear, just click OK for now, we will discuss exporting later on.
C. With the folder yourName highlighted give the project a name in Save As and click Save.
D. Audacity will create a folder where it stores audio information as well as the file myProject.aup. This file allows audacity to store editing information about you project, but this file is not playable in any other application or device.
...
3. Sample Rate: You will now need to set the sample rate for your project. If you are editing pre-existing audio, the first file you import into Audacity will set the sample rate. If you are going to make a new recording go to edit > preferences > quality (mac users: audacity > preferences > quality) set the Default Sample Rate to 44100 48000 Hz and leave the Default Sample Format to 16-bit.at 32-bit float. This will cover your bases for almost all audio projects, including audio being used in video. (If you're exporting in a lossless audio format, you can go to a higher sample rate, but in almost all cases, you will not need to do that.)
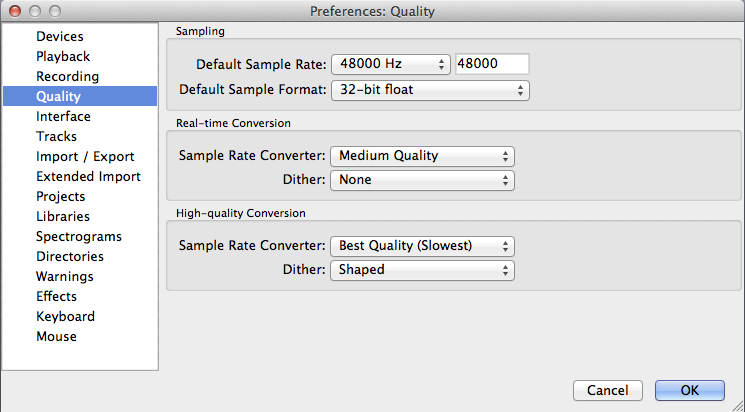

Note: Audio CDs have a sample rate of 44100 Hz with a 16bit format. This was established by the frequency at which humans hear. Sample rates are set at twice the level of the highest anticipated input frequency, and as the human ear cannot hear sounds above 20000 Hz, 44100 Hz safely covers the entire audible range.
4. File Location: We recommend that you preset Audacity to make a duplicate of your files when importing. To enable this feature go to edit > preferences > projects (mac users : audacity > preferences > projects) and check the option Always copy all audio into project (safest). This consolidates all of your audio files into the _data folder so if the dependent files are altered or moved your project will not be affected.
...
8. Press the record ![]() button in the upper left of the Audacity screen. You can press pause at anytime, the recording will resume from where you left off, otherwise press stop and the track cursor will return to the beginning.
button in the upper left of the Audacity screen. You can press pause at anytime, the recording will resume from where you left off, otherwise press stop and the track cursor will return to the beginning.
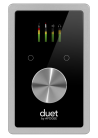
a. To test the track press play ![]() , if the recorded sound is faint or distorted you may need to adjust the input gain. Use the slider bar to adjust gain within Audacity, or adjust the line in volume on the peripheral equipment. To adjust the input volume on the Apogee Duet, press on the scroll wheel until the input you are using is selected, and then turn to adjust.
, if the recorded sound is faint or distorted you may need to adjust the input gain. Use the slider bar to adjust gain within Audacity, or adjust the line in volume on the peripheral equipment. To adjust the input volume on the Apogee Duet, press on the scroll wheel until the input you are using is selected, and then turn to adjust.
![]()
slider bar peripheral
b. You can also record a new track without affecting a previously recorded track and/or an imported audio file. If there is an existing track in your Audacity project, when you hit record, Audacity will start recording on a new track below the previous one. While recording, you will be able to hear the other tracks unless they are muted. For example, you can use this to record vocals over instrumental music.
9. Editing an Audio Track
...
- Saving Audacity Projects: Navigating to File > Save Project As saves your file in the Audacity .au format. This is a good way to store a project that you will need to resume editing at another time. But if you want to save your file in a format playable in another application or device, you will need to export.
- Exporting Audio File: Once you have finished editing your track, go to File > Export > Choose a file type and click Save.
...

AIFF and WAV formats are uncompressed audio files, ideal for use in editing programs such as Final Cut Pro. MP3 and AAC are compressed formats suitable for importing into audio players such as iTunes.

...
- Selecting options
...
- in the export window will let you set the quality of your export file type.
Suggested MP3 settings:
- Bit Rate Mode: This controls how the file will be encoded. Constant
...
- bit rate is recommended for its most compatibility! It may generate a bigger file size comparing to variable bit rate.
- Quality:
...
- 128kbps is the standard setup for songs; you can't go lower than 64kbs if you want to preserve good quality. For narrations or talk shows you can't go lower than 32kbs, typically the setup is 64kbs. The lower the bit rate, the smaller the file size. When the file is encoded at 64kbps, its size is approximately 0.5MB/minute. When the file is encoded at 128kbps, its size is approximately 1MB/minute.
...
- When the bit rate is doubled, the file size is almost doubled too.
- Variable Speed: This determines whether your encoding will be done quickly or with the best quality. It is only available if you are choosing Preset or Variable in the Bit Rate Mode section.
- Channel Mode:
...
- Stereo is the recommended setting for best audio quality. If your audio file is mono or there is relatively little difference between the left and right channels, you can choose the Joint Stereo option. This results in a slightly smaller file size.
...
- A new window will pop up offering you the chance to fill out some track information (i.e. tag data). Tag data embedded within MP3 files is used by your playback system (MP3 player or your computer’s media player) to display useful information about the track being played. The tag data helps to search for tracks, enabling you to search by artist, genre, year etc.. http://www.richardfarrar.com/what-are-id3-tags-in-mp3-files/

After you are done filling out this information click ok and your file will be converted.
Resources
# Audacity FAQ
http://audacityteam.org/help/faq
# Audacity Help
http://audacityteam.org/help/
# Audacity Manual
http://audacityteam.org/help/document
| Anchor | ||||
|---|---|---|---|---|
|