TABLE OF CONTENTS
| Table of Contents |
|---|
| Info |
|---|
This guide was created by the staff of the GIS/Data Center at Rice University and is to be used for individual educational purposes only. The steps outlined in this guide require access to ArcGIS Pro software and data that is available both online and at Fondren Library. The following text styles are used throughout the guide: Explanatory text appears in a regular font.
Folder and file names are in italics. Names of Programs, Windows, Panes, Views, or Buttons are Capitalized. 'Names of windows or entry fields are in single quotation marks.' "Text to be typed appears in double quotation marks." The following step-by-step instructions and screenshots are based on the Windows 10 operating system with the Windows Classic desktop theme and ArcGIS Pro 2.1.3 software. If your personal system configuration varies, you may experience minor differences from the instructions and screenshots. |
...
This course will teach you how to download, evaluate, and prepare GIS data from public online sources and set up a project in ArcGIS Pro.
...
- In the middle right of the page, click Download > Shapefile.


H-GAC GIS Datasets
...
- Using a web browser, search for "h-gac gis" and select the result as shown below or go directly to: http://www.h-gac.com/gis-applications-and-data/datasets.aspx
- Under the 'Dataset Categories' section, click the Hydrologic button to filter the results by subject.

- Under the 'Datasets' section, click Major Rivers.

- Click Download Dataset in the pop-up window.
- Click the blue Download button in the top right corner of the new window.
...
- On the Desktop, click the File Explorer icon located on the Windows Taskbar on the bottom left corner of the screen.
- Navigate to the Downloads folderIn the left column, click My Computer. In the right column, double-click C:/ > Users > gistrain.ADRICE > Downloads.
- Ensure that you see the following zipped folders in your Downloads folder.

- Select both folders.
- Right-click any of the selected folders and select 7-Zip > Extract Here. Your data is now in its decompressed format and ready to be brought into ArcGIS Pro.
...
- From the Windows Taskbar, click the blue globe icon to launch ArcGIS Pro.

- When ArcGIS Pro opens, under the 'Create a new project' section on the right side of the screen, click the Blank project template.

- In the 'Create a New Project' window, for the 'Name' input, type "Intro_Part2".
- For 'Location', click the yellow Browse... button to the right.
- In the 'Select a folder to store the project.' window, click Computer in the left column and click Desktop in the right column and click OK.
- In the 'Create a New Project' Window, click OK.
- Maximize the ArcGIS Pro application window.
...
- In the Catalog pane, right-click Folders and select Add Folder Connection.
- In the left column, click This PC My Computer. In the right column, click Downloads and click C:/ > Users > gistrain.ADRICE and single click on Downloads. Click OK.
- In the Catalog pane, expand Downloads.
- Fully expand all folders and geodatabases in the Downloads folder.
- We will repeat the above process to connect to a folder containing a sample of NHGIS data. In the Catalog pane, right-click Folders and select Add Folder Connection.
- In the left column click This PCMy Computer. In the right column, click gisdata (\\file-rnas.rice.edu)(R) > Short_Courses_HIST207 > HIST207_GDC2 > and single-click on NHGIS_Data and click Data. Click OK.
- In the Catalog pane, expand NHGIS_Data.
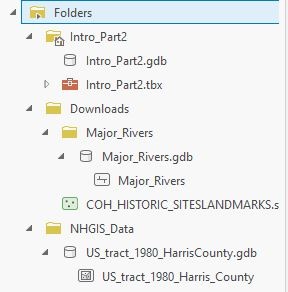
- Your 'Folders' directory should look like the below.

Importing and Exporting Data in the Project Geodatabase
For this tutorial, we are working with vector data which is a spatial data format that uses points, lines, and polygons to represent real features on the earthEarth's surface. Vector data is ideal for discrete themes with definite boundaries. A Feature Class is a vector storage data format that represents a homogeneous collection of common features. There are two types of Feature Classes: a Shapefile feature class and a Geodatabase feature class. A Shapefile feature class is an open source format. Its file extension is .shp and its icon is green. A Geodatabase feature class is an Esri proprietary format. A Geodatabase feature class must be stored inside a Geodatabase (.gdb) and its icon is white. To better organize our project, we will import the data we downloaded and the NHGIS sample data into our Project Geodatabase.
- In the Catalog pane, click the US_tract_1980_Harris_County geodatabase feature class located in the NHGIS folder and drag-and-drop it up into the Intro_Part2.gdb. A progress bar will appear that reads 'Copying...' Once it is complete, you will see a copy of US_tract_1980_Harris_County inside the Intro_Part2.gdb as shown below.

- Repeat the above step to drag-and-drop Major_Rivers from the Major_Rivers.gdb into the Intro_Part2.gdb.
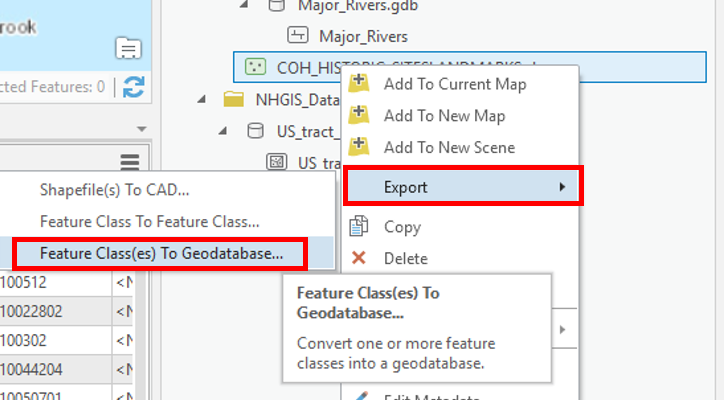
- COH_HISTORIC_SITESLANDMARKS is a Shapefile feature class, so it requires a different method to be imported into the Project Geodatabase. In the Catalog pane, right-click on COH_HISTORIC_SITESLANDMARKS.shp and select Export > Feature class(es) to geodatabase.
- Accept In the Geoprocessing pane, accept default settings as shown below and click Run.

- RightIn the Catalog pane, right-click on Intro_Part2.gdb and select Refresh.

- Your Project Geodatabase should now contain three Geodatabase feature classes: COH_HISTORIC_SITESLANDMARKS, Major_Rivers, and US_tract_1980_Harris_County.

- In the Catalog pane, in the Folders section, right-click on Downloads and select Remove.

- Repeat Step 7 to remove the connection to the NHGIS_Data folder.
Bonus: Symbolizing Layers By Attributes
- On the ribbon, click the Insert tab.
- In the Project group, click the New Map button.
- In the Catalog pane, right-click the US_tract_1980_Harris_County feature class and select Add To Current Map.
- Above the ribbon, on the Quick Access toolbar, click the Save button.
Symbolizing Layers By Quantity
- In the Contents pane, right-click the CensusUS_tract_20101980_ByHarris_SuperNeighborhoodCounty layer name and select Symbology.
...
- In the
...
- Symbology pane, click the primary drop-down menu
...
- and select
...
- Graduated Colors.

- Use the 'Field' drop-down menu to
...
- select the
...
- AV0AA1980 field. NHGIS data downloads include a read-me file that defines the codes for each field (column). AV0AA1980 stores the number of
...
- people within each
...
- census tract for the year 1980.
The
...
- Map view now displays a choropleth map, where the darker colors represent higher numbers of
...
- people. In studying the map, it appears as if
...
- there is no discernible pattern to population numbers. While this is true according to raw counts per
...
- census tract, there could be differences in the
...
- census tracts that are unaccounted for in this symbology. Now you will try normalizing by the area of the
...
- census tracts.
- Use the 'Normalization' drop-down menu to scroll to the bottom and select the last Shape_Area field.
...
-
The projection of the census layer is GCS WGS 1984. Therefore, the layer is unprojected and the coordinates are stored in angular units of decimal degrees. Therefore, the Shape_
...
- Area field is displaying square decimal degrees and the map is displaying number of
...
- people per square decimal degree. This is a somewhat
...
- incomprehensible unit, however, the values are still proportional to how they would be in a different unit and the relative coloring on the map remains correct.
...
projecting is further covered in the Introduction to Coordinate Systems and Projections course.
- Notice that according to the density of
...
- population count, the greatest amount of
...
- people appear to be
...
- inside
...
- Use the 'Normalization' drop-down menu to select the SUM_HU100 field.
...
- the major loops.
- On the lower half of the Symbology pane, click the Histogram tab.
----------------------------------------------------------------------
Discuss and test classification methods.
----------------------------------------------------------------------

- Use the 'Method" drop-down menu to select Equal Interval.
- Use the 'Method" drop-down menu to select Quantile.
----------------------------------------------------------------------
Discuss and test number of classes.
----------------------------------------------------------------------
- Use the 'Classes' drop-down menu to select 20.
- Use the 'Classes' drop-down menu to select
...
- 2.
----------------------------------------------------------------------
Discuss and test color schemes.
----------------------------------------------------------------------
Adding Layer Transparency
- Use the 'Color Scheme' drop-down menu to select a different color scheme of your choice.
Adding Layer Transparency
- In the Contents pane, ensure that the US_tract_1980_Harris_CountyEnsure that the Census_2010_By_SuperNeighborhood layer is selected.
- In the ribbon, click the
...
- Appearance
...
- tab.
- In the Effects group, slide the Layer Transparency slider or type "50" and hit Enter.
Symbolizing Layers By Category
- Use the primary 'Symbology' drop-down menu to selectUnique Values.
Use the 'Field 1' drop-down menu to selectName.
...
- Return the Layer Transparency slider to "0".
| Info |
|---|
Using what you learned in HIST 207 - Introduction to ArcGIS Pro, create a simple layout that displays US_tract_1980_Harris_County and export the layout as a PDF. |