...
| Info |
|---|
This guide was created by the staff of the GIS/Data Center at Rice University and is to be used for individual educational purposes only. The steps outlined in this guide require access to ArcGIS Pro software and data that is available both online and at Fondren Library. The following text styles are used throughout the guide: Explanatory text appears in a regular font.
Folder and file names are in italics. Names of Programs, Windows, Panes, Views, or Buttons are Capitalized. 'Names of windows or entry fields are in single quotation marks.' "Text to be typed appears in double quotation marks." |
| Info |
|---|
The following step-by-step instructions and screenshots are based on the Windows 10 operating system and ArcGIS Pro 2.5.0 software with an Advanced license. If your personal system configuration varies, you may experience minor differences from the instructions and screenshots. |
This course will teach you how to download, evaluate, and prepare GIS data from public online sources and set up a project in ArcGIS Pro.
...
Preparing the Downloaded Data for ArcGIS Pro
The following step-by-step instructions and screenshots are based on the Windows 10 operating system with ArcGIS Pro for Desktop 2.5.0 software with an Advanced license. If your personal system configuration varies, you may experience minor differences from the instructions and screenshots.
Once you have downloaded the Census and Major Roads data from H-GAC and the Bus Stops and Bus Routes data from Houston METRO, you should be able to locate the data files in your Downloads folder.
...
The full layout of the software will be covered in the Introduction to ArcGIS Pro short course tutoril. For now, all you will be using is the Catalog pane along the far right side of the application window.
...
- In the Catalog pane, right-click Folders and select Add Folder Connection.
- In the 'Add Folder Connection' window, click Computer in the left column and single-click Downloads in the right column. Click OK.
- In the Catalog pane, expand Downloads and ensure it looks as shown below. (If you followed Option 3 for obtaining the tutorial data and downloaded the data from this wiki page, you will only see four shapefiles listed.)

Importing and
...
exporting data in the
...
project geodatabase
For this tutorial, we are working with vector data, which is a spatial data format that uses points, lines, and polygons to represent real features on the Earth's surface. Vector data is ideal for discrete themes with definite boundaries. A Feature Class is a vector storage format that represents a homogeneous collection of common features. There are two types of Feature Classes: a Shapefile feature class and a Geodatabase feature class. A Shapefile feature class is an open source format. Its file extension is .shp and its icon is green. A Geodatabase feature class is an Esri proprietary format. A Geodatabase feature class must be stored inside a Geodatabase (.gdb) and its icon is white. To better organize our project, we will import data into our Project Geodatabase.
All of the data you have downloaded is in the shapefile format. Since shapefiles and geodatabases are different file formats, you must convert the data.
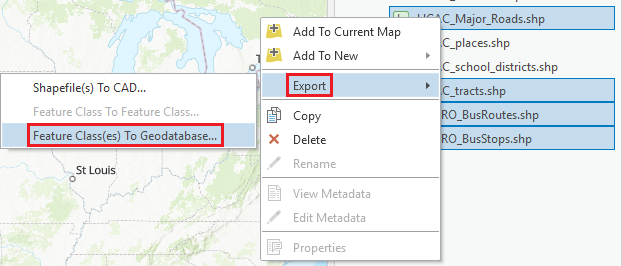
- In the Catalog pane, hold down the Ctrl key and clickHGAC_Major_Roads.shp, HGAC_tracts.shp, METRO_BusRoutes.shp, and METRO_BusStopsare Shapefile feature classes, so these Shapefiles require a specific method to be imported into the Project Geodatabase. In the Catalog pane, right-click on HGAC_tracts.shp and select Export > Feature class(es) to geodatabase.

- In the Geoprocessing pane, click the Folder button to the right of the blank input features drop-down.
- In the 'Input Features' window, click Project > Folders > Downloads in the right column and click Open.
- Find and select HGAC_Major_Roads.shp and click OK.
- Repeat steps 2-4 for METRO_BusRoutes.shp and METRO_BusStops.shp.
- .shp to select all four shapefiles, as shown below.

- Right-clickHGAC_Major_Roads.shp and select Export > Feature Class(es) To Geodatabase....
Note that the Geoprocessing pane opens on top of the Catalog pane. To toggle between the panes, you can use the tabs at the bottom of the pane.
- Ensure your 'Feature Class To Geodatabase' tool parameters appear as shown below and clickRun.

- At the bottom of the Geoprocessing pane, click the Catalog tabIn the Geoprocessing pane, accept default settings as shown below and click Run.

Navigate back to the Catalog pane by selecting the Catalog tab at the bottom of the Geoprocessing pane. - In the Catalog pane, right-click on the Intro.gdb and geodatabase and select Refresh.
- Expand If necessary, expand the Intro.gdb geodatabase. Your Project Geodatabase project geodatabase should now contain four Geodatabase geodatabase feature classes: HGAC_Major_Roads, HGAC_tracts, METRO_BusRoutes, and METRO_BusStops, as shown below.


- In the Catalog pane, in the Folders section, right-click on the Downloads and folder connection and select Remove.
- In the Quick Access toolbar at the top of the application window, click the Save button.

- Close ArcGIS Pro.