Gel electrophoresis is the standard lab procedure for separating DNA by size (e.g., length in base pairs) for visualization and purification. DNA is mixed with a viscous loading buffer that reduces DNA diffusion upon loading in wells in an agarose gel submerged in loading buffer in an electrophoresis chamber. Electrophoresis uses an electrical field generated by electrodes at opposite sides of the chamber to move the negatively charged DNA through the agarose gel matrix toward the positive electrode. Shorter DNA fragments migrate through the gel more quickly than longer ones. Thus, you can determine the approximate length of a DNA fragment by running it on an agarose gel alongside a DNA ladder (a collection of DNA fragments of known lengths). DNA dye added to the DNA sample or gel allows the DNA's visualization. More concentrated agarose in the gel slows down small fragments and increases separation of small fragments, while less concentrated agarose increases separation of large fragments. Higher voltage speeds up electrophoresis, but reduces overall resolution over a point. Reference and video. Described here is the protocol using a TAE agarose gel as the electrophoresis matrix.
–Shyam Bhakta
Materials
- Agarose powder
- 1× TAE (Tris-acetate–EDTA buffer)
- 50× TAE
- 40 mM Tris base: tris(hydroxymethyl)aminomethane
- 20 mM glacial acetic acid
- 2 mM EDTA: ethylenediaminetetraacetic acid
- pH 8.5
- Dilute 50× TAE to 1× for use:
Add 100 mL of 50× to empty 5 L carboy and fill to 5 L mark with diH2O. (no need to measure water in cylinders)
- 50× TAE
- DNA dye, 10,000×
- GelGreen, detailed in another section, is our standard.
- 6× DNA loading dye
- NEB 6× Purple loading dye that comes with all restriction enzymes is our standard. Its tracking dyes cast no UV shadow, with its red band migrating similarly to bromophenol blue. The usage of Ficoll® instead of glycerol as a thickener results in brighter, tighter bands. The SDS removes DNA-bound protein to improved band sharpness, and the EDTA chelates metal ligands to stop enzymatic reactions.
- DNA samples
- 1× dsDNA ladder in 1× DNA loading dye
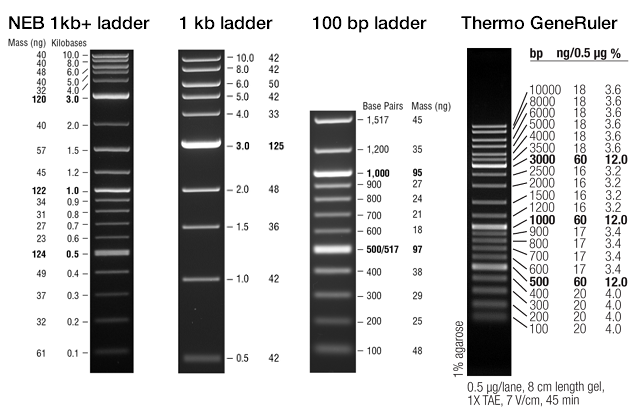
- NEB 1 kb+ "2-log" ladder is widely appropriate, with bands spanning 100 bp – 10 kb.
- Bottle or flask large enough for gel volume
- Microwave oven
- Gel caster (clamp)
- Gel tray of desired length
- Gel comb of desired size/thickness
- Electrophoresis chamber with clean-enough 1× TAE
- TAE can be reused for at least a week. When quite cloudy or with lots of particulates, replace buffer (see Step 2).
- Electrophoresis power supply
- Gel viewing equipment (blue-light source and orange glasses, or gel imager)
| Tracking Dye Comigration (bp) | ||||
| Agarose Concentration | Separation Range of Linear dsDNA | XC | BPB | OG |
|---|---|---|---|---|
| 0.5% m/V | 1 – 30 kb | 30000 | 4000 | 150 |
| 0.7% | 800 bp – 12 kb | 8000 | 400 | 75 |
| 1.0% | 500 bp – 10 kb | 4000 | 300 | 50 |
| 1.2% | 400 bp – 7 kb | 1800 | 150 | 15 |
| 1.5% | 200 bp – 3 kb | 1200 | 100 | 10 |
| 2.0% | 50 bp – 2 kb | 700 | 65 | 5 |
| XC: xylene cyanol. BPB: bromophenol blue. OG: Orange G. | ||||
| Linear dsDNA separation ranges across concentrations of standard low-EEO agarose Table 5-5 from Molecular Cloning 3rd Ed. (Sambrook & Russell) fused with Thermo reference See Thermo O'RangeRuler gels for a visual. | |
| Agarose Concentration | Separation Range |
|---|---|
| 0.3% m/V | 5 – 60 kb |
| 0.5% | 2 – 50 kb |
| 0.6% | 1 – 20 kb |
| 0.7% | 0.8 – 12 kb |
| 0.8% | 0.8 – 10 kb |
| 0.9% | 0.6 – 8 kb |
| 1.2% | 0.4 – 6 kb |
| 1.5% | 0.2 – 3 kb |
| 2.0% | 0.1 – 2 kb |
| 3.0% | 25 – 1000 bp |
| 4.0% | 10 – 500 bp |
| 5.0% | 10 – 300 bp |
| Linear dsDNA separation ranges across concentrations of different types of agarose Table 5-2 from Molecular Cloning 3rd Ed. (Sambrook & Russell) | ||||
| Concentration | Standard | High Gel Strength | Low T gel/melt | Low T gel/melt, Low Viscocity |
|---|---|---|---|---|
| 0.5% | 700 bp - 25 kb | |||
| 0.8% | 500 bp – 15 kb | 800 bp – 10 kb | ||
| 1.0% | 250 bp – 12 kb | 400 bp – 8 kb | ||
| 1.2% | 150 bp – 6 kb | 300 bp – 7 kb | ||
| 1.5% | 80 bp – 4 kb | 200 bp – 4 kb | ||
| 2.0% | 100 bp – 3 kb | |||
| 3.0% | 500 bp – 1 kb | |||
| 4.0% | 100 – 500 bp | |||
| 6.0% | 10 – 100 bp | |||
DNA Ladder
DNA ladders should be made with no-SDS purple loading dye (purple lidded ones from NEB). According to NEB and our own experience, SDS is not good for the ladder's sharpness with safe stains (GelGreen/GelRed/SafeStain-like dyes). We also see that ladder prepared with no-SDS loading dye at ≥20-fold the recommended dilution makes the ladder more accurate and much sharper with GelGreen. High dilution also reduces ladder usage ≈25-fold. NEB 1 kb Plus ladder for Safe Stains (ready-to-load/1×) additionally replaces FICOLL with glycerol, so perhaps FICOLL might also reduce band sharpness with safe stains. Thermo ladders and TriTrack loading dyes lack SDS and FICOLL and use glycerol. NEB also recommends a slow 5 V/cm (75 V for 15 cm tank), 60–90 min run to for best results with safe stains, though 8 V/cm (120 V) seems to work fine for routine use (, similar to ladder the image )below.
NEB 1 kb ladder, 45 ng in 9 µL 0.75 mm thick well | |

Following the NEB protocol of loading a 1:6 dilution (mix of 4 µL water/TE, 1 µL no-SDS loading dye, 1 µL ladder = 1 µg) often produces smeary, size-shifted ladder that uses 27-fold more ladder per lane than necessary by my the high-dilution method below, using 5 ng/µL ladder for visualizing with the high sensitivity of GelGreen and a DSLR camera/enclosure. Less GelGreen (½×) also helps reduce band retardation and smear. Higher ladder DNA and/or GelGreen or other dye concentrations may need to be used for less-sensitive dyes and imaging/visualization equipment (e.g. phone camera, UV, EtBr).
| Ready-to-Load Ladder | For volume V: | For 1.5 mL: | |
|---|---|---|---|
| DNA-grade water | up to V | 1242.5 µL | } Mix these first! |
| 5× No-SDS loading dye | V÷6 | 250 µL | |
| Ladder DNA (undyed) | V÷200 | 7.5 µL, 7.5 µg | 1 kb+ ladder (1 µg/µL). Final 5 ng/µL. |
| or V÷100 | or 15 µL, 7.5 µg | 1 kb or 100 bp ladder (0.5 µg/µL). Final 5 ng/µL. | |
Vortex water and no-SDS loading dye together; then add purified ladder thawed slowly at room temp, and invert to mix. Do not vortex or heat; may denature DNA.
| |||
Gel Preparation
- Weigh and mix agarose powder with 1× TAE to desired agarose concentration in a flask or bottle. An flask for agarose is usually by the gel station. Make enough volume for however many gels at their respective concentrations.
Alternatively, obtain previously prepared solid agarose gel in bottle/flask.- Agarose gels are commonly used in concentrations of 0.7–2% m/V, depending on the expected size of bands needing to be resolved. See table.
- Gels can be pre-casted and stored wrapped tightly in plastic (or submerged in 1× TAE + 1× DNA dye) in a dark, airtight container at 4°C. (room temp also works for storing in buffer)
- With a loosened cap, microwave agarose suspension or solid until completely clear and homogeneous liquid (≈1 min per 100 mL on high), swirling midway and handling with a silicone mit. Watch as it boils to stop the microwave before it can overflow. Continue microwaving in smaller increments if necessary.
- Inspect the solution closely, swirling in the air with light from behind to look for undissolved agarose chips, which appear as small transparent "lenses" refracting light.
- E.g. you can keep a bottle of 2% agarose and melt it when needed, diluting with TAE in a second flask to the desired 0.7–2% concentration. Pouring in a second container and dilution also cools it, so the poured gel can set faster. Gels can also be poured on a level fridge or freezer shelf for even quicker solidifying.
- If prestaining the gel, to a final ¼–½× add 10,000× GelGreen/GelRed DNA dye to the molten agarose and swirl until color is uniform.
- Dye can be incorporated into the gel during preparation (prestaining), after gel electrophoresis by incubating in a dye bath (poststaining), or solely added to the DNA sample (sample dying). Prestaining is most robust. Post-staining requires more time and monitoring. Sample staining is most cost-effective, requiring only 0.6% the dye needed to prestain a gel; however, it impacts DNA migration and so is not best for very analytical purposes and ought to be used with a similarly dyed ladder.
- Dyes like ethidium bromide are mutagens. Even safe dyes must be handled cautiously.
- GelGreen is still very effective at ⅓–½× for restriction digests of ~100 ng DNA, reducing cost and band retardation by the dye. Higher quantities of DNA in PCR products can be visualized with even less GelGreen. Only in rare cases may 1× GelGreen be needed in prestained gels.
- Position tray(s) in center of clamp and tighten clamp moderately. Place desired comb(s) in tray slots, oriented so the prongs are closer to the top of the gel. Ensure tray is level using bubble level, adjusting gel caster's screw feet.
- Pick gel casting trays appropriate for your use. The 7 cm tray holds 40 mL when filled to the top of comb prongs, and the 10 cm tray holds 55 mL.
For gel purification purposes, you may want a thick gel (tray filled to top of comb prongs) to minimize the number of wells needed to hold the samples. For analytical purposes, you may need only a thin gel (casted to half comb prong height) to hold small volumes of samples such as analytical DNA digests or colony PCRs. - Pick comb thickness appropriate for your use. Thinner combs are superior for analytical purposes, as they result in thin bands more accurately resolvable. Thicker combs can be superior for purification purposes, as they hold more sample. A full-height thick, narrow well holds ≈30 µL; a full-height thick, wide well holds ≈60 µL.
- Pick gel casting trays appropriate for your use. The 7 cm tray holds 40 mL when filled to the top of comb prongs, and the 10 cm tray holds 55 mL.
- Allow boiling agarose to cool to ≈55°C before pouring to prevent tray/clamp warpingwear.
With a mitt, pour molten agarose in trays to desired level while sti Use comb to pull bubbles and impurities away to end of gel.- Bubbles can be pushed to the edges of the gel using the comb or poked with a Kimwipepipette tip or tissue.
- <0.5% gels should be poured on top of a pre-set comb-less thin 1% agarose supporting gel layer to strengthen it enough for handling without fracturing (unless to be imaged with the tray). The gel can also be cooled to 4°C to reduce chance of fracturing.
- Allow the gel to solidify at room temperature or level at 4°C, 10–20 min.
- Pre-chilled caster and tray speeds solidification.
- Gels may be stored wrapped tightly in plastic wrap and placed in a sealed container in the dark.
- Refrigeration does not improve gel quality over 2 weeks of storage. See image at end.
Sample Preparation, Loading, and Electrophoresis
- Mix samples with 6× loading dye (loading buffer).
- If sample-staining, ensure the 6× loading dye also contains 1× GelGreen/GelRed.
- Loading dye does not typically contain any DNA dye, only tracking dyes that allow you to see your sample when loading and visibly estimate DNA migration progression (see chart on left). Loading dye also contains glycerol, sucrose, or PEG to weigh down the sample in the well.
- Fill electrophoresis chamber with 1× TAE (running buffer) until it's a bit under the gel+tray height.
- If running buffer is cloudy or has crystals, empty into sink. Carefully remove electrodes, scrub residue out of tank with brush or towel, and rinse chamber, doing a final rinse with diH2O. Never point a water stream near the electrode filaments while installed, or else they can be damaged.
- When using ethidium bromide, some people add it to the running buffer as well as the gel.
- Remove comb from cast gel and submerge gel+tray in the electrophoresis chamber, oriented with wells at the top and the negative (black) terminals of the chamber at the top. If necessary, add TAE to cover the gel by 1 mm.
- Gels can be cut to save lanes for later use. The tray isn't always necessary. Gels must be stored in TAE + DNA dye (if prestained), TAE (if unstained), or wrapped ≈airtight in plastic wrap.
- Load samples and, finally, ladder into wells. Pre-dyed ladder is generally at the gel station.
- While loading, maintain positive pressure on the sample to prevent bubbles or buffer from entering the tip. Release any air at the tip of the tip so no bubbles are released when loading.
Hover the tip of the tip above the well. Slowly and steadily, push the sample out and watch as the sample fills the well. After all of the sample is unloaded, push the pipettor to the second stop as you raise the pipette out of the buffer. - Pipetting into the bottom of the well (a more difficult method) allows more sample to fit in a well. Moving the gel or pipette tip while it's in a well containing sample may expel part of the sample from the well. Keep everything steady when ejecting inside a well.
- While loading, maintain positive pressure on the sample to prevent bubbles or buffer from entering the tip. Release any air at the tip of the tip so no bubbles are released when loading.
- Secure the lid onto the chamber, and plug in lid into power supply.
- Match terminal colors. Ensure negative black terminals are at the top of the chamber and lid and positive red at the bottom. Thus anionic nucleic acids run to the red anode. Run to red.
- 120 V for 20–30 min generally sufficient.
Common settings are 80, 120, 150 V for 40, 25, 15 min, respectively. Higher voltage speeds migration, at the expense of some resolution and band tightness due to ohmic heat. - BioRad MiniSub Cell GT electrodes are 15 cm apart. Starting the power supply without entering a run time will show time counting up.
- Match terminal colors. Ensure negative black terminals are at the top of the chamber and lid and positive red at the bottom. Thus anionic nucleic acids run to the red anode. Run to red.
- Monitor the countdown and run until bromophenol blue has run ≈75% the gel length or Orange G is ≈90% the gel length. Try not to run DNA off the gel or into a lower row of lanes.
- The blue/purple tracking dye migrates at the rate of ≈300 bp DNA and should typically migrate ¾ of the lane length before ending.
- Gel can be visualized in real time with blue flashlight and orange goggles appropriate for blue dyes and GFPs. See
- Don't leave the gel in the buffer; DNA and dye will slowly diffuse out.
- (opt.) If poststaining, submerge the gel in 1× TAE + 1–3× DNA dye solution, rocking for 15–30 min. Bands may appear after 5 min.
- Biotium recommends using 3× GelGreen in the stain, and that including 0.1 M NaCl in the staining solution enhances sensitivity but may promote dye precipitation impairing the stain's reuse.
- Visualize the gel under blue light with orange glasses (or UV with UV shield). If cutting the gel, only do so while it is in a Petri dish so as not to scratch the transilluminator surface.
To image the gel with the blue light (or UV) imager: Open Canon EOS utility on the computer to awaken the connected camera and use Remote Live View to adjust the gel position and autofocus before taking a picture. The camera should typically be in the No Flash setting (auto-set exposure, ISO, and aperture). Exit EOS Utility when done.- Blue light is safer to work with and is far less-damaging to DNA than UV light. Requires GelGreen, SYBR green, SYBR Safe, etc. 302 nm UV light can cause ~2% of the initial DNA acquiring loss-of-function mutations per second of exposure, with 99% loss-of-function by 60 s [source] .
- Dispose gel/gel fragments in gel waste bucket lined with black bag, found under gel bench. Wipe the transilluminator of TAE. Rinse buffer/DNA residue out of the Petri dish.

GelGreen and GelRed Dyes
GelGreen is stable for a decade in water at room-temp, microwaveable, is more sensitive and safe than other blue/safe modern dyes, noncytotoxic: water solvent and non-cell/glove-permeable.
Properties
GelGreen (product manual) is stable for ≥10 years in aqueous solution at room temperature stored dark, including dilutions [Dueber Lab]. This contrasts with unstable and less-sensitive modern safe DNA dyes such as SYBR dyes. GelGreen and GelRed do degrade slowly over light exposure time, so it is best to store aliquots in amber/black tubes and stained gels in dark containers. (If precipitates are found on the surface as if stored cold, heat 45–50° for a few minutes and vortex.)
GelGreen's thermal/hydrolytic stability also allows it to be microwaved with agarose if needed, so dyed agarose can be stored, and molten and poured on demand with little loss in sensitivity.
Casted, dyed gels can be stored for later use by wrapping in plastic wrap and placing in a dark box at room-temp for up to a month [Biotium ]. Low temperature further slows evaporation, potentially improving storage, though Biotium says this may cause dye precipitation in the gel. Shyam has not noticed any quality decrease in cold-stored gels.
GelGreen's main absorption peak is in the blue spectrum but has a smaller peak (½ size) in the UV range, allowing visualization by blue or UV light.
Smeary bands can be troubleshooted by reducing the DNA quantity loaded and reducing its concentration, and/or reducing the GelGreen concentration in the gel to ½× or ¼×. Hence Shyam finding ladders run the crispest with minimal ladder DNA and at high dilution to distribute it across the well, and promotes using ½–¼× GelGreen in prestained gels.
Alternatives
The GreenView line of dyes may be good, as well. The least sensitive one (regular GreenView) is aqueous, 58% the cost of GelGreen, but also the most cell-permeable at 1× according to their images, though still safer than the equivalent SYBR dye. The more sensitive GreenView Plus and Ultra are DMSO-based and have less cell-permeance (though DMSO would make the 10,000× very skin-permeable).
Toxicity
So long as you don't get the DMSO-based one, GelGreen/Red aren't glove-permeable or cell-permeable; thus we only buy water-based GelGreen. Some literature from Biotium:
GelGreen® was subjected to a series of tests at Biotium and by three independent testing services to assess the dye’s safety for routine handling and disposal. Test results confirm that the dye does not penetrate latex gloves and cell membranes. Unlike the highly mutagenic EtBr and the reportedly mutation-enhancing SYBR® Green I (1), GelGreen® is noncytotoxic and nonmutagenic at concentrations well above the working concentrations used in gel staining, because of the dye’s inability to cross cell membranes. GelGreen® successfully passed environmental safety tests in compliance with CCR Title 22 Hazardous Waste Characterization, under which GelGreen® is classified as nonhazardous waste. A complete safety report is available at www.biotium.com.
SYBR® Safe is one of the original ethidium bromide alternatives to be marketed as safe. However, it has been reported to show mutagenicity after metabolic activation in the Ames test (9). While SYBR® Safe is reported to be non-mutagenic in Syrian hamster embryo (SHE) cells and L5178YTK +/- mouse lymphoma cells (10), it was tested at concentrations well below its 1× working concentration of 0.66 µg/mL (11) due to its excessive cytotoxicity (9). These results are consistent with the fact that SYBR® Safe rapidly penetrates cell membranes and stains the nucleus of live cells. Nancy-520, a SYBR derivative, also readily penetrates living cells to interact with DNA, suggesting that it has similar potential for cytotoxicity. Moreover, these dyes also showed no advantage in sensitivity compared to GelRed™ or GelGreen™.
Alternative Electrophoresis Buffers
Sodium borate (SB) (1) and lithium acetate borate (LAB) (2, 3, 4) have been found by a few studies to be superior buffers for higher voltage, faster electrophoresis without problems due to overheating of the buffer and gel. TBE (tris-borate EDTA) is more popular, also allows higher voltage to a lesser degree, though. However, users trying these buffers report the buffer reusability is much lower; they precipitate quickly, unlike TAE which can sit out in a chamber for two weeks of use. LAB and TBE must be bottled back up for any reuse, which adds a hassle. And these buffers don't work well with GelGreen/GelRed prestaining, so must be post-stained, adding time in which one loses all time saved from the faster, higher voltage run.
Blue Light Imaging Setup
Mutagenesis by UV visualization damages DNA such that loss-of-function mutations and DNA damage leave a mere 1% of DNA transformable within a minute's time after 302 nm exposure [source] . Using blue-light dyes and imaging allows you to image and safely cut bands from a gel without mutagenic UV.
Want to make a great blue-light imager for cheap, for use with your gels? Here's what you'll need.
- Blue transilluminator + filter: $180–250 http://public.iorodeo.com/docs/led_transilluminator/
- Large size: 1.65 LEDs/cm²
- Emission spectra: https://blog.iorodeo.com/emission-spectra-led-transilluminator/
- Enclosure: $360–370 Cell phone hole or DSLR mount. http://public.iorodeo.com/docs/gel_imaging_enclosure/
- Alternatives: miniPCR bio blueBox (small S: 1.07 LEDs/cm², large Pro: 0.87 LEDs/cm²); miniPCR bio Gelato: 1.67 LEDs/cm².
- Camera (opt.): Any DSLR compatible with Canon EOS Utility, roughly any camera released 2008 and after. Canon EOS 1000D, 1100D, 1200D, 1300D are an appropriate series. 10 MP and ISO 1600 are plenty for good gel images. The newer the model, the more pixels, ISO, and autofocus points. Canon EOS 1100D ($200–250, released in 2011, is a good compromise of price and age, if you're looking to minimize cost. https://www.amazon.com/gp/offer-listing/B004J3Y9U6 Timeline and features of Canon cameras: https://en.wikipedia.org/wiki/Comparison_of_Canon_EOS_digital_cameras
- Lens: stock 18-55mm (likely included with camera)
- Software: Canon EOS Utility (free) https://www.usa.canon.com/internet/portal/us/home/support/self-help-center/eos-utility/
- AC adapter: Search for one compatible with your camera model. This way, you won't have to keep on charging the battery.
- USB data cable: may be included with camera.
Instructions: Place the transilluminator in the enclosure, weaving the wire through the wire port. Fasten the camera to the top, lens pointing through the hole over orange filter. Switch the camera battery for the AC adapter and plug it in. Hook up the USB to a computer running the Canon EOS Utility.
Another old DIY enclosure/camera guide: http://www.labtimes.org/labtimes/issues/lt2011/lt02/lt_2011_02_64_65.pdf
If you want inspect gels with green DNA dyes while they run or see GFP/YFP/CFP fluorescence in bacterial colonies/pellets, you can buy this flashlight and filter goggles:
- Blue flashlight: https://www.amazon.com/gp/product/B01C2D7SRA
- Orange glasses: https://www.amazon.com/gp/product/B003OBZ64M
- 14500 batteries/charger for flashlights: https://www.amazon.com/gp/product/B0035H9A1K
Consider lithium batteries in the 14500 / AA size for longer life.