...
- On the Map tab, select Select by Attributes….

- In the Geoprocessing pane, use ‘Layer Name or Table View’ drop-down menu to selectSubwatershed.
- Use the ‘Selection Type’ drop-down menu to select New selection.
- Click Add Clause.

- Select Values.
A list of all values stored in the HUC_8 field will appear in the box on the right.
- Select Subwatershed, and is equal to, in the first two fields.
- Type ‘12040104’ in the last field.
- Verify that your ‘Select By Attributes’ pane appears as shown on the following page and click Add.
|

- Click Run.
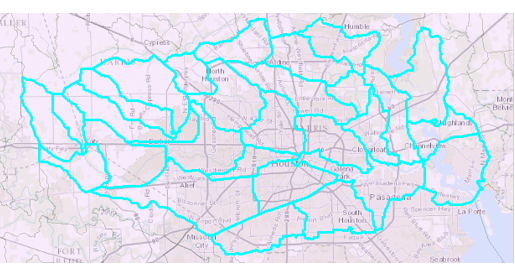
- In the Table of Contents, right-click the Subwatershed layer and select Selection à -> Zoom To Selection.
Exporting selected features
...
- In the Table of Contents, right-click the Subwatershed layer and select Data à -> Export Features….
Notice that, by default, the ‘Export Data’ window is set to export only the selected features using the coordinate system of the data source. Also notice that the output feature class defaults to the HydrologyLab geodatabase, because you initially set this as your default geodatabase.
- For ‘Output feature class:’, rename “Subwatershed_CopyFeatures” to “SubwatershedsNew”.
- Ensure your ‘Copy Features’ window appears as shown below and click Run.

Since you’ve exported the particular subwatersheds of interest, you may now remove the master subwatersheds layer from your map document.
...
- On the Standard toolbar, click the Save button.

At the top of the Table of Contents window, notice that the leftmost List By Drawing Order button is currently selected.
- At the top of the Table of Contents, click the List By Source button.

The Source tab displays the full file path locations of all the data layers referenced in your map document. By default, the map document will store this full file path to all of your data files.
...
- On the Map tab, click the Analysis tab and select the Tools.
- On the search bar, type Dissolve and press Enter. Double-click Dissolve (Data Management Tools).
- In the top right corner of the ‘Dissolve’ window, click question mark icon.
...
- For ‘Input Features’, drag in the SubwatershedsNew layer from the Table of Contents.
- For ‘Output Feature Class’, rename the feature class from “SubwatershedsNew_Dissolve” to “Subbasin[g1] ”.
- For ‘Dissolve_Field(s)’, select the HUC_8 field, since this is the field containing the common subbasin value you wish to dissolve on.
- Ensure your ‘Dissolve’ window appears as shown below, and click Run.

- In the Table of Contents, toggle the new Subbasin layer off and on to get a better idea of the result of the Dissolve tool.
- In the Table of Contents, right-click the Subbasin layer and select Attribute Table.
...