...
- In the Contents pane, check the StreamGagesStreamGage layer which you brought in at the beginning with the Geographic feature dataset from the NFIEGeo_12 Geodatabase.
- On the Main menuribbon, click the Map tab.
- Click the Select By Location…Location button.
- For ‘Input Feature Layer’, check the StreamGage layerFeatures’, use the drop-down menu to select the StreamGage layer.
- For ‘Relationship’, use the drop-down menu to select withinWithin.
- For ‘Selecting Features’, use use the drop-down menu to select the Subbasin layer.
- Ensure your ‘Select by Location’ window appears as shown and click Run.
 Click OK.
All of the stream gages that are within the subbasin are now selected.
- Export the selected StreamGage features into your HydrologyLab geodatabase and name the new feature class “SubbasinStreamGages”.
- Remove the original StreamGage layer from the Contents pane.
- Save your project.
- When you are finished creating your layout, closeArcGIS Pro.
...
Export a layout
- Return to the Layout view.
- On the ribbon, click the Share tab and click the Layout button in the Export group to open the Export Layout pane on the right.

- In the Export Layout pane, use the 'File Type' drop-down menu to select PDF.
- For 'Name', type "Lab 1 Watersheds" and click Export.
- Save your project.
FOR MAP LAYOUT TO BE TURNED IN
...
- In a web browser, go to http://arcgis.com.
...
- .
- On the top right search bar, search for SSURGO "SSURGO Downloader".
- Again, if necessary, in the 'Filters' section on the left sidebar, toggle off Only search in Rice University, at which point the proper layer should appear.

- Scroll down and clickClick the result SSURGO Downloader web mapping application.

- On the right hand side of the page webpage click View the View Application button.

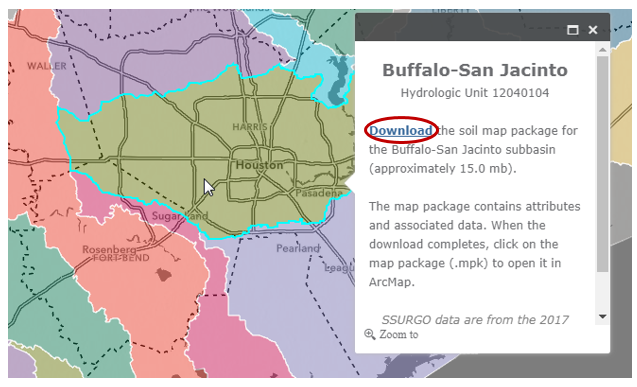
- In the search bar in the top corner, type Houston "Houston, TX".

- Click in the Buffalo-San Jacinto subbasin to select it and click the Download link.
- Right-click on your downloaded BuffaloSanJacinto_12040104.ppkx ppkx file and select Show Show in folder. Copy the file.
- Navigate back to your HydrologyLab folder.
- Paste the BuffaloSanJacinto_12040104.ppkx ppkx file directly inside your HydrologyLab folder. Do NOT paste it inside the Hydrologylab.gdb geodatabase.
- Single click the file and press Enter.
- A new ArcGIS Pro application window will open. You will complete Part 5 using this window. Do not delete your previous ArcGIS Pro window.
...
- In the Contents pane, right-click the Map Units layer and select Remove.
- Open the Soils Symbology pane.
- Click Graduated colors.
- Use the ‘Field’ drop-down menu to select the Available Water Storage 0-100 cm – Weighted Average field.
Symbolizing features by quantities using graduated colors
...
- Shift select all symbols. Right-click to select Format Format Symbols….
There is a bug in the software that sometimes prevents the ‘Properties for All Symbols’ interface from opening. As an alternative, you may shift-select all five symbols and right-click and select Properties for Selected Symbol(s)….
- Click Properties Properties. Use the ‘Outline Color:’ drop-down menu to select No Color.
- Click Apply.
- Symbolize the Subbasin layer using the same symbology as you used in the Lab1 map document.
...