Camtasia is software used to record onscreen activity, audio and web cam video and narrate existing PowerPoint presentations. Through Camtasia, you can record, edit, produce and share course content.
Tips before start your Camtasia project:
- Clean up desktop
- Write a script or outline
- Do a practice run through
To record:
- Launch Camtasia
- Close existing project or go to File > New Project
- Hit the Record button located on the middle toolbar

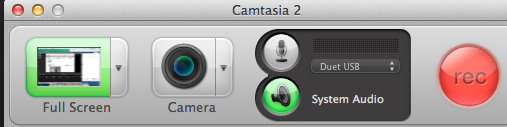
- The following window pops up:
 Select recording region:
- By default, Camtasia records the entire screen of your main monitor. Choose this option when your recording content includes:
A large or full-screen application or web browser.
Multiple applications or web browser windows.
Action that spans across the entire screen including the dock, application menus, etc
- You can also record a custom region. Record a region of the screen when:
You only want to show a specific window or region of the screen, no extra content.
You need to record at specific dimensions.
You want to record at dimensions larger or smaller than one of Camtasia's presets, but still maintain the same aspect ratio of the preset.
- Record using a preset when you want to share to a destination that requires specific dimensions such as YouTube, iPhone, or to embed on a website.
- To access custom region or preset region, click on the triangle to the right and choose your desired region from the drop-down menu:

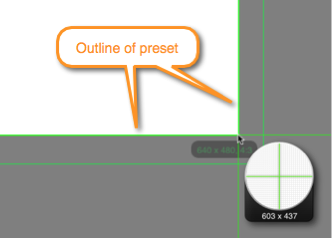
- To set your own custom region, choose Custom Region, crosshairs appear
 .
. - To select an area, click and drag on the screen. As you drag the cursor near a preset, an outline of the preset appears.
- To select a window, move the cursor over the window until a green border appears around the window. Click within the window to select that area.
You cannot access any applications or system settings while in the selection mode. Make sure to edit the audio settings, application or window position, and other system settings before selecting the area to record.
To cancel selection, click on back arrow or press Esc to edit these items
 .
.
- By default, Camtasia records the entire screen of your main monitor. Choose this option when your recording content includes:
- Select camera option: if you want to use the built-in iSight camera to record youself, click on Camera to turn in on. A preview of the camera appears.
- Select audio:
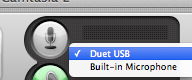
- From the Audio menu, be sure to select Duet USB NOT built-in microphone, as you want to record with the desktop microphones with Duet audio interface.
- From the Audio menu, be sure to select Duet USB NOT built-in microphone, as you want to record with the desktop microphones with Duet audio interface.