- Insert your DVD into the drive. The movie may begin to play; just pause and quit the DVD player.
- Open HandBrake
 . The following screen should appear, allowing you to select the disk you previously inserted. If it does not, click the Source button on the top left of the screen. Select your disc and click open.
- HandBrake will open and scan the disc. Once the scan is complete, HandBrake menu will load. Handbrake chooses what it thinks is the main title, but you can click the pop-up menu next to Title
 and choose the item you want to encode. Generally speaking, the title with the longest duration is the DVD’s main feature. If you want to make sure you’ve chosen the right title before you start encoding, pick the one you think you want, then click the Preview Window
  button and a new window opens up. From there you can scroll through ten still images from the title or, if that’s not good enough, choose to encode and watch 15 to 240 seconds of the title.
 - If you encounter problems such as HandBrake quitting or crashing when it scans your DVD, or a DVD with 99 titles of almost the same length, you’ve run into copy-protection scheme meant to thwart ripping. In that case, launch Apple’s DVD Player application, and navigate through the warnings, ads, and previews until you’re playing the main feature. Then choose Go > Title from the menu bar, and find the title with a chek mark next to it. In HandBrake choose File > Open Source (Title Specific), select your DVD, and enter that title number in the box and click Open Title.
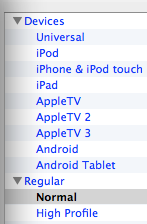
- Choose your encoding settings based on the device(s) on which you plan to view the content. If the Presets Drawer isn’t already open, click the Toggle Presets button at the top of the HandBrake window. If you just want to rip the DVD to have digital files, then Regular Normal preset should be fine.
- If your movie is in a foreign language, or you have a hearing impairment and need to read the closed captions when you watch, HandBrake’s Subtitles tab is the place to look. There you can find whatever subtitle or captioning data comes on your DVD and decide which to include in your ripped file. Typically, subtitles must be burned into your file, meaning you can’t turn them on or off, whereas closed captioning data is added as a separate text track that you can choose while watching in QuickTime.
- Be sure to check the highlighted settings to ensure the Duration matches the length of your disk. Then click on the dropdown menu next to title (the blue box below). If the disc content has been broken up into more than one section here, you must digitize each section or else you will only get a portion of the content.
- After selecting the proper section, click Browse next the File Destination (orange box in the photo above). Here, you can rename the file by changing the name in the box next to Save As (shown in the yellow box below). Then select your USB or however you plan to save the file. If you need to temporarily store it here, select SAVE WORK HERE.
- In the format tab (under Output Settings), ensure the MP4 file has been selected. All other default settings are correct.
- Click the green start button on the top left screen. The disc will begin to digitize.
- If the disc was broken up into multiple sections (under the title menu), be sure to digitize each section.
- Be sure to remove your disc from the drive once you are finished.
If you want to convert several items, click the Add To Queue  button, and then repeat the process for each item until you’ve added them all to the encoding queue. You might even find it easier to choose File > Add All Titles To Queue, which as you might expect adds everything to the queue. From there you can delete any title that you don’t want to rip by clicking the X to the right of each title’s name.
https://trac.handbrake.fr/wiki/Decomb
http://www.macworld.com/article/1142301/beyond_HandBrake_defaults.html