The difference between subtitle and caption :
- Captions include subtitles plus a written description of what is occurring in their videos for viewers who might not be able to hear or understand the sound.
- Subtitles provide viewers with a video’s dialogue in written form and can be used to translate the spoken language.
The benefit of adding subtitle to videos:
- Subtitles enable deaf and hard of hearing users to watch videos. This is important for all video publishers especially educational institutions who need to comply with accessibility laws and internal policies.
- Subtitles can be translated into different languages which help you reach broader audience.
- They also act as metadata that helps your videos show up in more places on YouTube.
Subtitle formats:
- There are many subtitles formats, such as SRT, WebVTT, DFXP/TTML, SCC, and SAMI files, but the most commons file is SRT.
What is SRT file:
- SubRip caption files are named with the extension .SRT. This format is supported by most video players and subtitle creation programs. The time format used is hours:minutes:seconds:milliseconds, with the milliseconds field precise to three decimal places. The purpose of srt subtitle file is to be used with desired movie file together to display subtitles when you play video file by any player supporting srt subtitles. If your video doesn’t include any subtitles, you can create and add a .srt file to your video.
How to create SRT file:
To create SRT file, you can either use Aegisub freeware at the DMC or simply use notepad or any text editor.
Create SRT file with Aegisub:
- All DMC video editing stations have Aegisub installed and it looks like this:

- Open Aegisub, simply enter your caption text alongside a start and finish timecode. The first timecode is a start timecode for this line of text; second timecode is the finish timecode; the third timecode is the line duration. You can adjust the timecode according to your video. Press Enter to add this line to the sequence window below.
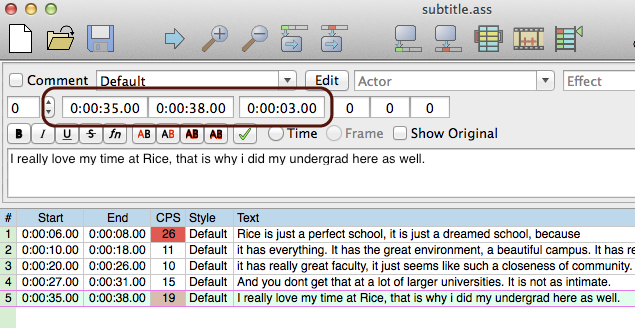
- Use spacebar to play and pause your video with any media player or within Final Cut Pro X while creating SRT file with Aegisub. Try to make the start and end timecode as accurate as possible.
- Repeat the step 2 until all the lines are inputted.
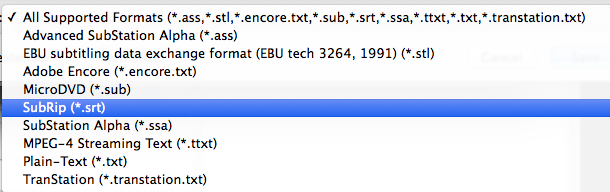
Go to File > Export As..., continue to click on Export, and be sure to save as SubRip(*.srt) file type.
- All DMC video editing stations have Aegisub installed and it looks like this:
Create SRT with NotePad
- Open Notepad, WordPad, or other text editor that allows to save file with SRT file extension.
- Edit subtitles shown as below:
Notes: SRT consists of four parts, all in text.- A number indicating which subtitle it is in the sequence.
- The time that the subtitle should appear on the screen, and then disappear. The time format used is hours:minutes:seconds:milliseconds, with the milliseconds field precise to three decimal places.
- The subtitle itself.
- A blank line indicating the start of a new subtitle.

- Save subtitles to .srt format:
- In Notepad, please click menu File->Save As, change file name to “xxx.srt”, set “Save as type” to “All Files”;
- Set “Encoding” to "ANSI" if using English subtitles, or “UTF-8" if using non-English subtitles.

How to encode subtitles
To add subtitle to your videos, you may use freeware HandBrake![]() . HandBrake is available on all DMC video editing stations and can also be downloaded to your computer for free.
. HandBrake is available on all DMC video editing stations and can also be downloaded to your computer for free.
- Open HandBrake, click the Source button and choose your video file . Go ahead and choose a destination for your output file and leave everything else as is. Make sure Normal is chosen in the Presets menu on the far right.

- Now click on the Subtitles tab at the bottom and click on the Import SRT button. Pick the SRT file and it will show up in the list box below

- You can add more than one subtitle file if you need, i.e. for multiple languages.
- Click on Start to start encoding your subtitles.
How to add subtitles in YouTube or Vimeo
Add subtitle to your YouTube video:
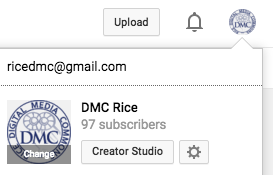
- Log into your YouTube channel.
- Click on your account located on upper right corner, then click on Creator Studio
- Within Creator Studio, click on VIDEO MANAGER on the far left
 .
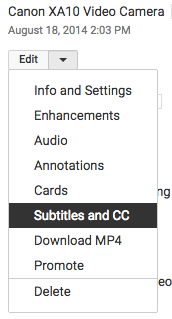
. - Next to the video you want to add subtitles to, click the drop-down menu next to the Edit button and select Subtitles and CC.
- In the drop-down menu, choose the language that's spoken most in the video and click Set language.
- Click the Add subtitles or CC button.
- Choose the type of file to upload
- Click the Choose file button and browse your computer for the file
- The file will auto-populate and let you know the timing of each subtitle or closed caption
- For more information, visit https://support.google.com/youtube/answer/2734796?hl=en
Add subtitle to your Vimeo video: