A Pecha Kucha presentation is a simple presentation where you show 20 images or slides, each for 20 seconds (i.e. 20x20). The slides/images will advance automatically to keep you on time. So the total presentation is 6 minutes 40 seconds long.
- Open PowerPoint, File -> New; Home -> Layout -> Blank;
- With the first slide selected, hit Return to create 19 more slides;
- Command + A on a Mac or Control + A on a PC to select all the 20 slides, Transitions -> uncheck the box of On Mouse Click, check the box of After, then put 20 seconds; This will enable the slides advance automatically in 20 seconds.
- Then go through each slide, to add images and/or text;
- When finished, like a regular slide show, go to Slide Show -> Play from start.
- A PowerPoint template for Pecha Kucha presentation is available to download here DMC-PechaKucha-presentation-template.pptx.
Creating a Pecha Kucha Presentation Using Keynote
- Open Keynote, File-> New; Choose a theme, a Photo Essay is recommended.
- With the first slide selected, hit Return to create 19 more slides.
- Command + A to select all the 20 slides. Animate-> Start Transition -> change it fro On Click to Automatically - Delay 20.00 S. This will This will enable the slides advance automatically in 20 seconds.
- Then go through each slide, to add images and/or text;
- When finished, like a regular slide show, go to Play -> Play Slideshow.
- A Keynote template for Pecha Kucha presentation is available to download here DMC-PechaKucha-presentation-template.key.zip.
Note: Google Presentation doesn't have 20 seconds option to automatically advance the slides. File -> Publish to the web; auto - advance slides, (1,2,3,5,10,15,30 seconds, 1 minute).
Tips and Tricks
- Checking image resolution
This is to help prevent pixel artifact from displaying.
From left to right, low resolution image, image after more pixels added in, original high resolution image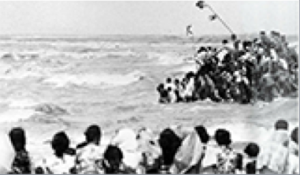
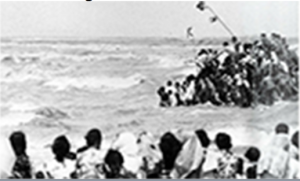
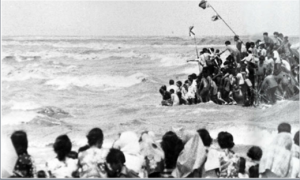
- If an image is in a very low resolution, it may look pixelated when it is projected to a big screen or printed large.
- Upscaling images by adding in more pixels will reduce/minimize pixel artifacts. This interpolation process increases pixel count. However, it can't increase the amount of details. If the detail was never captured it can't be replaced. The results of upscaling images are nothing like what you'd get with an image that was higher resolution to start with.
- On Mac, open the image with Preview, Tools -> Adjust Size...
- On PC, open the image with Paint, Home -> Resize...
- Increase the image resolution to match the projecting device's resolution. For instance, DMC's projector has a resolution of 1024x768; DMC's multipurpose room's big screen has a resolution of 1920x1080.
- Placing an image onto a slide
- Have a placeholder on the slide. A placeholder is much like a picture frame, which gives you more flexibility when manipulating images.
- Drag an image into the placeholder; or have the placeholder selected, then copy and paste an image into it.
- Adjust the placeholder border (i.e. the black bracket) to cover the whole slide
- Crop picture to fill placeholder if important content won't be lost with cropping
- Resize picture to fit inside placeholder otherwise.
- Using placeholder to crop images
- A placeholder can be duplicated when it is empty.
- After an image is placed inside the placeholder, only the image will be copied when you use copy function. The placeholder won't be copied.
- Removing the background from an image
This helps to bring focus to the key part of the image and makes the text and image look more integrated.
- Double click an image on a slide
- Format Picture -> Remove Background
- Drag the rectangle to make it cover all the foreground. The background is shaded with Magenta color.
- Draw lines within the areas that you want to include or exclude from the background image.
- Click Remove Background
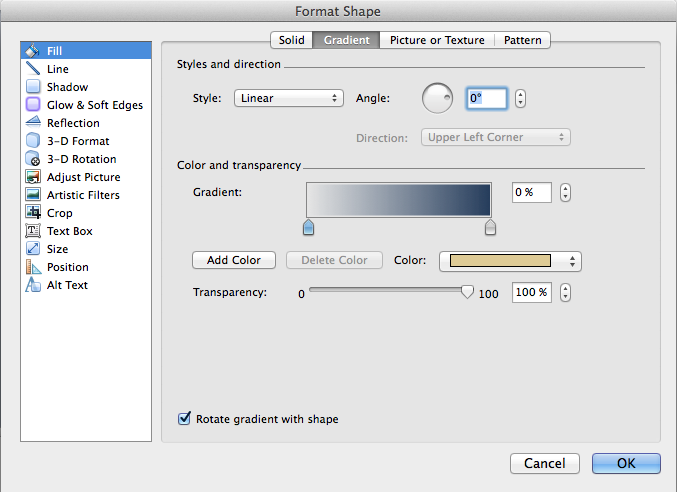
- Fading an image into a solid color
This allows you to blend your image into a solid color or background color to highlight text or to bring focus to the key part of the image.
- Home -> Insert -> Shape, choose rectangle
- Draw a rectangle
- Fill -> Fill Effects..., Fill -> Gradient. Choose the direction of the gradient fill.
- Next, select the two gradient colors. Click to select the left gradient bucket, from the Color drop down menu, choose More Colors...., choose the Magnifying glass to sample a color on the image. Set the transparency to 100%, which will make the rectangle blended seamlessly to the image.
- Click to select the right gradient bucket, from the Color drop down menu, choose More Colors...., choose the Magnifying glass to sample a color on the image. Set the transparency to 0%, which will make the rectangle have solid color at one end.

- Creating masks to highlight key areas in an image
Semi-transparent mask enables you to highlight a section on an image.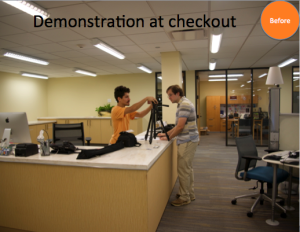
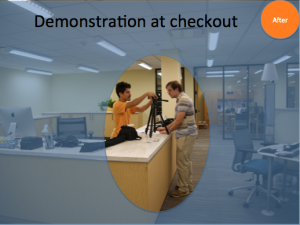
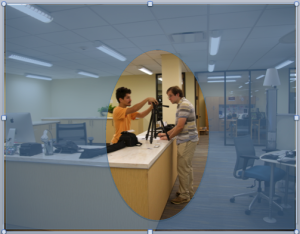
- Home -> Shape -> Rectangles, select the Rectangle shape, draw it to cover the whole image, Fill -> Fill Effects..., Fill -> Solid, choose a solid color and adjust transparency to about 50%, then click OK to apply.
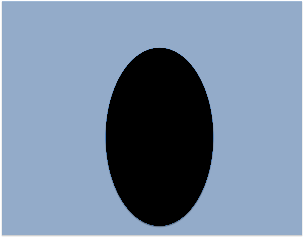
- Home -> Shape -> Basic Shapes, select the Circle shape, draw it around the area you want to highlight, Fill -> black or a different color then what you choose above. Click the oval you just draw, Arrange -> Bring to Front
- Select the oval and the semi-transparent rectangle, right click over, Save as picture..., save it as a PNG file since PNG file can preserve transparency setting.
- Delete the oval and the semi-transparent rectangle, then drag the saved PNG file over the image, Recolor -> Set Transparent Color, click the black oval. Then you should see the After effect.
- Picture superiority effect
what can people remember three days later? Oral – 10%, visual – 35%, oral+visual – 65%. Source: Najjar, LJ (1998) principles of educational multimedia user interface design (via Brain Rules by John Medina, 2008).- Brain Rules for Presenters http://www.slideshare.net/garr/brain-rules-for-presenters/112-Why_is_vision_such_a
- Web storytelling http://www.slideshare.net/cyberandy/web-storytelling-and-open-data-publishing-for-tourism
- removing image background
- adding highlights to images
- checking image resolutions
- using smart chart
- Animations
- contrast of images
Finding Free Media
References:
- Creating a Pecha Kucha Presentation Using PowerPoint http://blogs.cofc.edu/tlttutorials/2012/10/25/creating-a-pecha-kucha-presentation-using-powerpoint/
10 Tips to Create and Present Pecha Kucha http://blog.indezine.com/2012/05/10-tips-to-create-and-present-pecha.html
Pecha Kucha: tips, resources & examples https://catherinecronin.wordpress.com/2012/06/13/pecha-kucha/, http://www.usc.edu/dept/education/CMMR/Pecha_Kucha_TipsResourcesExamples.pdf
How to Fade Your Images in PowerPoint without the Help of Photoshop http://www.guidingtech.com/16107/fade-images-powerpoint-without-photoshop/
Fade Images in Photoshop Using Layer masks
Photoshop Levels - Output Levels
Creating mask in PowerPoint http://technotoolbox.blogspot.com/2009/09/creating-masks-in-powerpoint.html
What is the theme? - PowerPoint https://support.office.com/en-us/article/What-is-a-theme-7528ccc2-4327-4692-8bf5-9b5a3f2a5ef5
Theme colors handle both light and dark backgrounds very well. There are visibility rules built into the theme so that you can switch colors at any time and all your content will remain legible and still look good.
The light colors are always visible over the dark colors and vice versa, such as when dark color text is used over a light background. There are six accent colors that look good over any of the four possible background colors.
When you click Colors in the Themes group, the colors that you see next to the theme name represent one set of light/dark background color and the accent colors for that theme. If you change any of these colors to create your own set of theme colors, the colors that are shown on the Colors button and next to the Theme name will be updated accordingly.
Notice how the dark and light text and the background colors are automatically switched based on the background that you choose. Many slide show projectors show dark backgrounds and light text better than they show light backgrounds and dark text.