* Please take the following precautions when using plotter:
DO NOT TURN OFF the plotter as the plotter goes to sleep itself. This prevents print heads from getting clogged.
DO NOT LIFT UP THE BLUE LEVER unless the plotter menu tells so in order to align the paper.
When paper jam happens, please find DMC professional staff members for troubleshooting. DO NOT lift up the lever and try to fix it yourself.
Please follow the following paper load/unload instruction. DO NOT MESS WITH THE PLOTTER as this will cause plotter to malfunction.
Note that the plotter goes to sleep mode if not being used for a while. To wake up the plotter, press the menu key on the plotter, the plotter will start "initializing mechanics" . Wait till the initialization process is finished and the plotter is at the "Ready" screen, then start to load/unload paper roll.
Troubleshooting:
What happened when a segment of a poster is missing (i.e. not printed on the poster) after printing?
Sometimes if a PDF file is generated with PowerPoint on PC, and you use Preview on Mac to print, some text boxes on the PDF file may not print. Some label text boxes may appear while they don't exist in the original PDF. In this situation, use Adobe Acrobat, the file should print out fine then.What if the poster PDF is printing grayscale instead of color when sending the print job from Acrobat?
On the Print screen, go to Advanced next to Printer, then make sure Composite is selected under Color in the Output panel, not Composite Gray.


- What to do when "Printing is paused" and is unable to process any printing job?
You will need to manually delete all printed files to clear plotter's memory in order for the plotter to process current print job. To do so, go to menu, use up and down arrow to navigate to Job Management Menu > Job Queue, select files, press OK, and delete. - What should we do if the plotter is making some strange grey streaks whenever large blocks of color are present?
The streak problem happened before particularly on canvas. According to Library IT staff, it is due to the humidity. The ink would not get absorbed quickly on canvas due to humid weather (since the plotter is very close to the emergency door, so it is more sensitive to the humidity level). Therefore, we either ask patron to switch to semi-glossy paper, or have patron give it a try at Earth Science where the canvas printing is also available if patron insists on using canvas. This is exactly what happened to me yesterday morning. Patron’s printout on canvas had noticeable streaks, so we ended up printing on semi-glossy, and the poster turned out to be great.It is hard to judge when the streaks would happen to what file. However, if it is humid outside, and patron wouldn’t mind switching to semi-glossy, we would encourage patron to print on semi-glossy. If patron insists on canvas, then give it a try and have patron monitor the printing process closely, as soon as the streaks is found, cancel the print job.
- The poster plotter at the DMC is getting noticeable colored streaks on print outs.
Check the last settings you used for the poster that is having the problem. The plotter tells you the last settings that were used and why you are having print quality issues. Like the screenshot below. It is recommended to use the best print quality to avoid banding, graininess and color inaccuracy.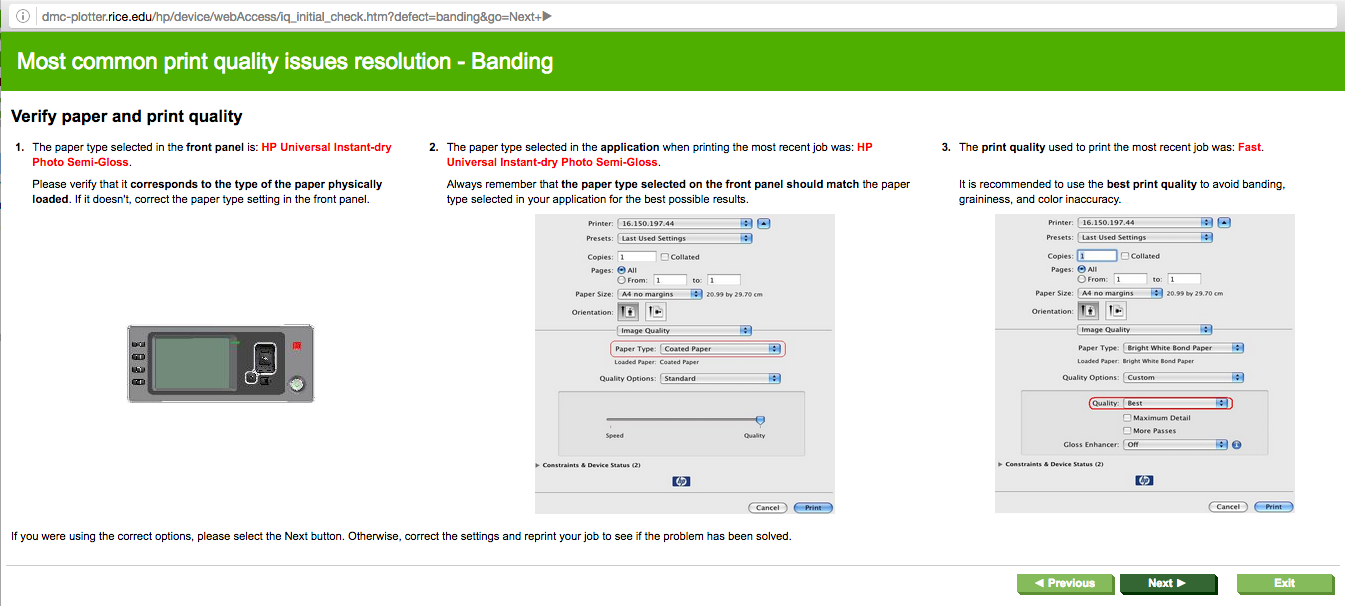
- How to avoid prints from running out of paper just before finishing?
When a new roll of semi-glossy paper is being loaded, the plotter would ask for paper information, such as paper type and length. The new roll is 100 feet long, as long as we input this information correctly the first time you load the new roll, then plotter should be able to keep track of how much has been used, thus would print available length on the paper each time the roll is being unloaded. If there is not enough paper left, the plotter would let you know and would not print the current job until you load enough paper.
However, if no paper length information is found whatsoever, the plotter would keep plotting until the paper runs out. This is frustrating and wastes our ink. To avoid this problem: 1) try to input the paper length info correctly every time you load the new roll ; 2) if this info is unavailable for the current roll, then use your own judgement and see if there is enough paper on current roll for heavy continuous plotting job, if not, load a new roll. Ink costs more than paper, so better to discard the paper than waste the ink in this case.
Since the plotter cannot cut the canvas, thus it cannot print paper information on the canvas like the barcode on semi-glossy paper, therefore, there is no way to determine the paper length left on the current roll. Please use your own judgement to see whether the roll has enough paper for upcoming plotting job.
- How to advance canvas ?
Since the plotte won't cut canvas after plotting, poster has to be cut off the plotter manually with the help of DMC staff member. To ensure enough extra media for printing and cutting, canvas paper needs to be advanced after loading and printing. To do so, simply press paper advance key, which is the bottom left key next to the LCD screen, until you see the edge of canvas comes out of the window or you get enough sized sheet for cutting. - How to replace maintenance cartridge?
The prompt message from the plotter is “The Printhead cleaning kit is full. Replace”. So the printhead cleaning kit is the same thing as the maintenance cartridge. Don’t confuse that in the future if you see that next time. To replace, press menu on the plotter, menu -> ink -> maintenance cartridge replacement, Open the right door under the menu, the maintenance cartridge should be ejected, you just need to pull it out and replace. - Margins on top side of semi-glossy paper is 0.5 in, all other sides of paper and canvas is 5mm (i.e. 0.2 inch) for this plotter.
- When printing high resolution image, for best result, please open the image with Adobe Photoshop and print via Adobe Photoshop print dialog and make sure the setting is as follows:
Color Management- Color Handling: Printer Manage Colors
- Rendering Intent: Perceptual
- Plotter
- Print Settings
- Color Matching: "In Printer"