TABLE OF CONTENTS
| Table of Contents |
|---|
| Info |
|---|
This guide was created by the staff of the GIS/Data Center at Rice University and is to be used for individual educational purposes only. The steps outlined in this guide require access to ArcGIS Pro software and data that is available both online and at Fondren Library. |
...
| Info |
|---|
The following text styles are used throughout the guide: Explanatory text appears in a regular font.
Folder and file names are in italics. Names of Programs, Windows, Panes, Views, or Buttons are Capitalized. 'Names of windows or entry fields are in single quotation marks.' "Text to be typed appears in double quotation marks." |
...
If you are completing this tutorial from a public computer in Fondren Library and are logged on using the gistrain profile, follow the instructions below:
- On the Desktop, click the File Explorer icon
 located on the Windows Taskbar at the bottom left corner of the screen.
 - In the 'File Explorer' window, click This PC on left side panel and then navigate to GISData (\\smb.rdf double-click the Computer icon > gisdata (\\file-rnas.rice.edu\research\FondrenGDC) (RO:) > > GDCTraining > 1_Short_Courses > > Introduction_to_Coordinate_Systems_and_Projections.
- To create a personal copy of the tutorial data, drag the Projections folder onto the Desktop.
- Close all windows.
...
- Click Projections.zip above to download the tutorial data.
- Open the Downloads folder.
- Right-click Projections.zip and select Extract All....
- In the 'Extract Compressed (Zipped) Folders' window, accept the default location into the Downloads folder and click Extract.
- Drag the unzipped Projections folder onto your Desktop.
- Close all windows.
...
- In the Catalog view in the center of the application (not the Catalog pane on the right), double-click the Databases folder.
- Double-click the Projections.gdb geodatabase.
...
- In the Contents pane on the left, double-click the MajorRoads layer name to open the 'Layer Properties' window.
- On the left, click the Source tab.
- Scroll down and expand the Spatial Reference section.
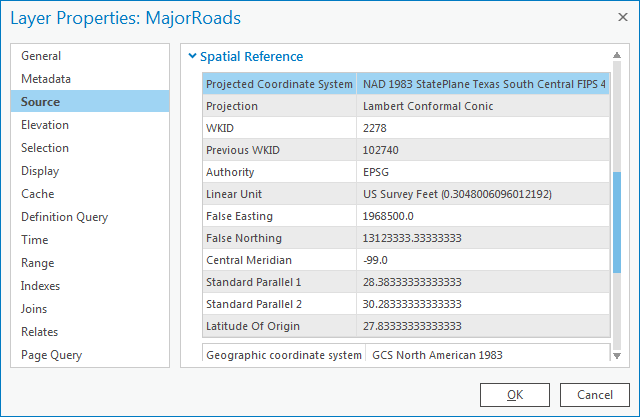
Under the ‘Spatial Reference’ section, scroll down and notice that both a geographic coordinate system and a projection are listed, which indicates that the coordinate system of this feature class has already been defined.
...
The geographic coordinate system and projection for each of the three feature classes you investigated are summarized in the table below.
Layer | Geographic Coordinate System | Projected Coordinate System |
MajorRoads | NAD 1983 | State Plane Texas South Central |
| Schools | NAD 1983 | Texas Centric Mapping System |
County | Undefined | Undefined |
Displaying Undefined Layers
...
While those coordinates are being displayed for general reference purposes, recall that the XY coordinates for data in the State Plane projection are actually stored in feet. You will now change your map view to display units in feet, so that you can see the actual XY coordinates stored in your data.
- DoubleIn the Contents pane, double-click Map to open the 'Map Properties' window.
- On the left, click the General tab.
...
- Use the 'Display units' drop-down menu to select US Feet and click OK.
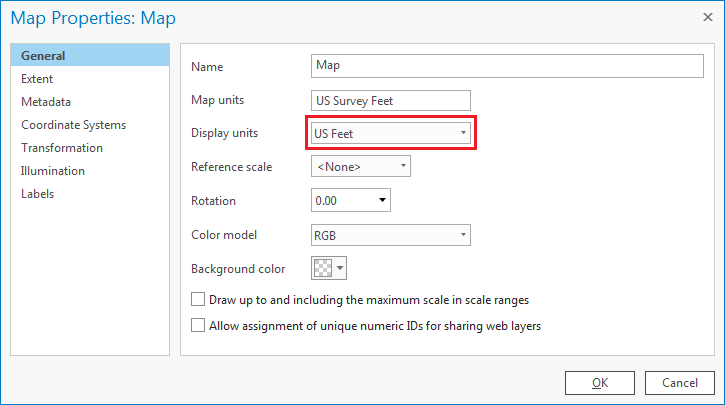
Now, notice when you move your cursor around the map, the coordinates listed in the bottom of the map view are similar to those shown below, indicating the location of Houston in the State Plane coordinate system with units of millions of feet.

- In the Table of Contents pane, right-click the County layer and select Zoom to Layer.
...
Of the three feature classes you examined, the County feature class was the only one that was undefined. Since the spatial reference information cannot be located using ArcGIS, you must turn to the source of the data itself. The data was originally downloaded from the following website: http://www.esri.com/data/download/census2000-tigerline, which is no longer available. A screenshot of the metadata provided on that website appears below.
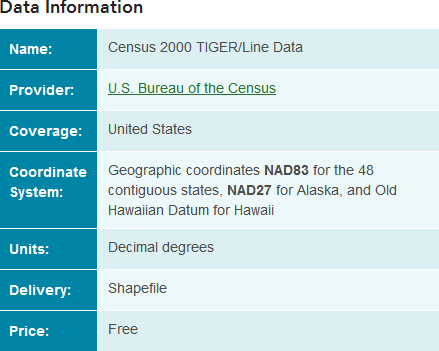
The metadata indicates that you must define the geographic coordinate system for the layer as NAD83, or North American Datum 1983. Fortunately, this is the same geographic coordinate system used by the other two layers. Since no projection is listed, you can assume that the layer has not been projected and was created in a geographic coordinate system only. The fact that the units are listed as decimal degrees further confirms this assumption.
...
Now that all of your data has been defined, you can transform all the feature classes into a common projection. Unlike the process of defining data, where there is only one projection you can use (the one specified in the metadata), when projecting data, you can select whichever projection best suites your particular combination of data and tasks at handstudy area and research question measurement types. Since your data focuses on the Harris County Houston region, the State Plane Texas South Central projection would be suitable.
...
The State Plane Texas South Central projection has been selected for the final map projection. All layers that are not currently in that projection will need to be re-projected, such as the County and Schools feature classes. All layers that are already in the final projection can be left as is and do not need to be re-projected, such as the MajorRoads feature class.
Layer | Geographic Coordinate System | Projected Coordinate System | Matches Final Projection? |
MajorRoads | NAD 1983 | State Plane Texas South Central | Yes |
| Schools | NAD 1983 | Texas Centric Mapping System | No |
County | NAD 1983 | None | No |
...
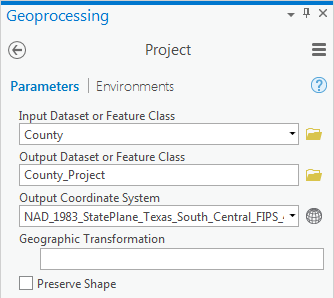
- At the top of the Geoprocessing pane, click the Back arrow.
- In the 'Find Tools' search bar, type ‘project’.
- Click the Project tool to open it.
- For 'Input Dataset or Feature Class', use the drop-down menu to select the County layer.
Note that the output dataset is saved to the same geodatabase as the input dataset and the name of the output feature class has the suffix “_Project” tacked onto appended to the end of the original input feature class name to indicate which tool was used to produce that feature class.
- For ‘Output Coordinate System’, use the drop-down menu to select the MajorRoads layer.
Notice that the NAD 1983 State Plane Texas South Central projection has now been imported from the MajorRoads layer. While you could have again navigated to the projectionyourselfprojection yourself, in this case, you know that the same coordinate system is already used by the MajorRoads layer. In such an instance, it is easier to import the coordinate system from another layer, especially if you are not familiar with where the coordinate system of interest is stored in the overall hierarchy.
- Ensure that your Geoprocessing pane appears as shown below and click Run.
When previously defining a layer, you simply updated the metadata attached to that layer to include the known coordinate system and projection. When projecting a layer, you have actually created a second copy of the data in the new coordinate system. The original layer stays in the native coordinate system and the new layer is converted to the desired coordinate system.
- In the Catalog pane, rightdouble-click the County_Project and select Properties. Navigate layer name.
- On the left, ensure to the Source menu tab is still selected and expand the Spatial ReferenceReference section.
Note that the Geographic geographic coordinate system is still GCS North American 1983 and that the new coordinate system is NAD 1983 StatePlane Texas South Central FIPS 4204 Feet.
- In the ‘Feature Class Properties’ window, click Cancel. In the ‘Layer Properties: County_Project’ window, click Cancel.
You will now repeat the same process to re-project the Schools feature class from the Texas Statewide Mapping System projection into the State Plane Texas South Central projection.
- Repeat steps 3-7all steps in the 'Projecting Layers' section with the Schools layer. When your Geoprocessing pane looks like the one appears as shown below, select Run.

All of your layers have now been projected into the State Plane Texas South Central projection.
...