If you are doing an architecture project that focuses on Houston, most of the data you will need is outlined below, along with instructions for managing data and exporting to CAD, Illustrator, and Rhino. If your project is not about Houston, check our other ARCH Studios locations or check the "Common GIS Data" section.
Getting Started
For your project, you will be using ArcGIS Pro, the latest program from the ArcGIS Suite. If you do not have much experience in our lab, first use the guide Introduction to ArcGIS Pro.
Creating a New Map
A map is a project item used to display and work with geographic data in two dimensions. The first step to visualizing any data is creating a new map.
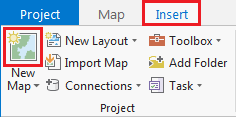
- On the ribbon, click the Insert tab.
- In the Project group, click the New Map button.
You will notice that a new map view opens in the main section of ArcGIS Pro.
The panel on the left side of ArcGIS Pro is called the Contents pane. After creating a new map, the Contents pane now displays the default Map title and automatically adds the Topographic basemap layer to the map.
The panel on the right side of ArcGIS Pro is called the Catalog pane. After creating the first map, a new Maps section has been added to the top of the Project tab within the Catalog pane.
- In the Catalog pane, click the arrow to expand the Maps section.

Notice that there is a single map there, named "Map". Since most projects will have multiple maps, it is a good idea to name your maps with more descriptive titles.
- In the Catalog pane, under the Maps section, right-click Map and select Rename.
- Type your desired map name and and hit Enter.
- In ArcGIS Pro, in the Catalog Pane, right click on the Folders and choose "Add folder connection." Navigate to O:\Cataloged\Local\HarrisHouston\CityOfHouston then choose "cohgis2014Q1" and add it as a new folder connection.
- In the Catalog Pane, expand the COHGIS folder and expand the COHGIS_2014.gdb database. Drag the file Freeways to your map window.
Then, you should add the Streets Basemap file so you can identify the area you wish to focus on.
- In the Map tab, click Basemap.
- Select Streets.

Now you can use the basemap to find your area of interest.
Obtaining Data
There is a wide variety of Houston data you can use for your project. These include:
Roads, Pavement, Building Footprints, Contour Lines, Land Parcels, and Aerial Imagery.
All of these can be found on this Wiki page under Common GIS Data>Houston. If you need data not listed here, please ask a GDC staff member for assistance.
Processing Data
After obtaining your data, you can process them in many ways. For the following basic processing steps, follow the guide instructions:
Clipping, Merging, Joining Tables, Symbolizing, Creating 3D Images, and/or Adding a Legend.
Instructions for all of these processing methods can be found on this Wiki page under Common GIS Methods>Processing Data. If you need to process your data in another way, please ask a GDC staff member for assistance.
Exporting
Once you have obtained and processed the data to your liking, it is time to export. There are three main exporting methods:
CAD, Illustrator, and Rhino.
If you have any other questions about exporting, ask a GDC staff member.